Peach Blossom Crochet Toddler Dress Free Pattern
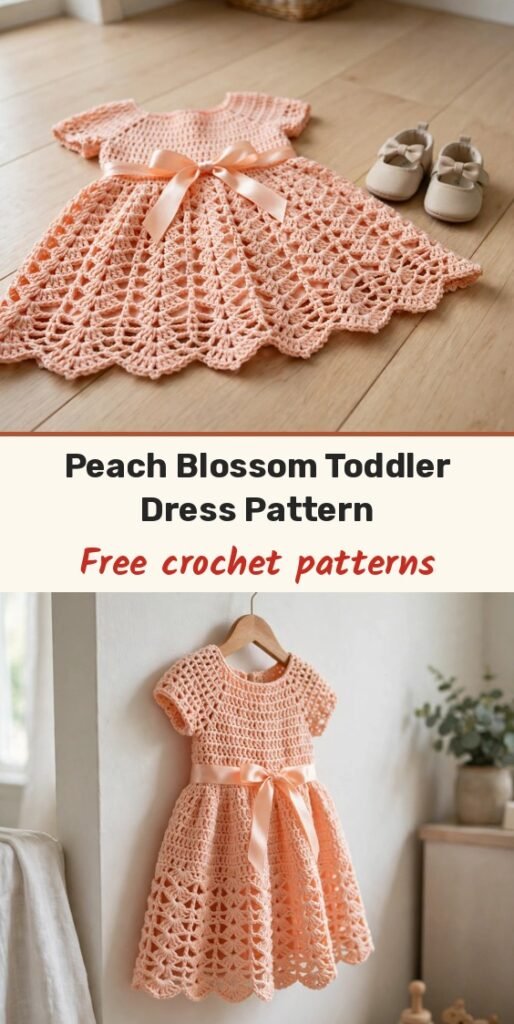
Table of Contents
Crocheted dresses can look intimidating, I know! All those delicate shells, that structured bodice, the pretty drape of the skirt. But here is the truth: if you can double crochet and follow a stitch count, you can absolutely make this sweet peach blossom toddler dress.
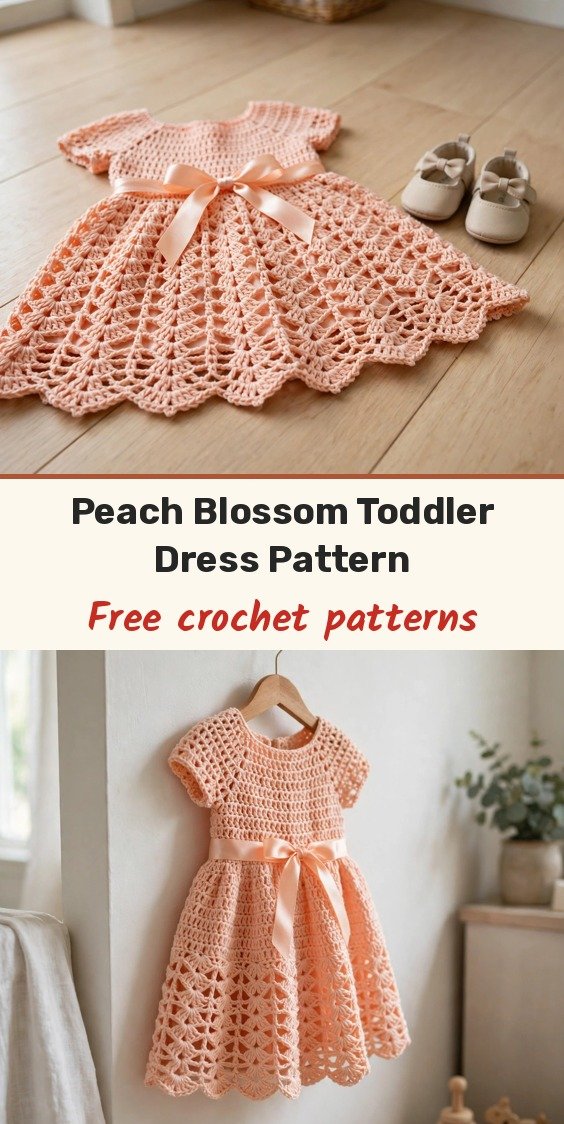
We will work from the top down, which means you can try it on your little one as you go. We start at the neckline, work outward for the yoke, split for the bodice with its decorative button placket, then rejoin for the shell lace skirt with a scalloped hem. A satin ribbon threaded through eyelets at the waist is the final elegant touch, and there is no seaming at the end!
This pattern is written for toddler size 2T, fitting approximately 1 to 2 years old. Every row and round carries its stitch count, and I have included checkpoints so you can measure your progress as you work.
Materials
- Approximately 400 yards worsted weight (CYCA 4) yarn in peach or coral
- 4.0mm (US G-6) crochet hook
- 4 to 5 decorative pearl or shank buttons, approximately 12mm diameter
- 1 yard of satin ribbon, 1 inch wide, in coordinating coral or peach
- Tapestry needle for weaving ends
- Stitch markers (at least 4)
- Scissors
- Blocking mat and pins
Abbreviations
- ch: chain
- sc: single crochet
- hdc: half double crochet
- dc: double crochet
- hdc2tog: half double crochet two together, a decrease
- sl st: slip stitch
- sk: skip
- rep: repeat
- RS/WS: right side / wrong side
- st/sts: stitch / stitches
Special Stitches
- Shell stitch: work 5 double crochet all into the same stitch, forming one shell unit that fans out into a scallop
- Fan stitch: work (2 dc, ch 2, 2 dc) all into the same stitch or space
- Scallop edging: in the indicated stitch or space, work (sc, hdc, 3 dc, hdc, sc)
Gauge & Size
- Gauge: 16 hdc and 12 rows = 4 inches in flat hdc rows; one complete shell repeat (12 sts) = approximately 2.5 inches wide and 4 rounds of shell pattern = approximately 2 inches tall
- Finished size: toddler 2T, chest approximately 20 inches at underarm, total length approximately 17 inches from shoulder to hem, skirt approximately 9 inches from waist to hem
- Construction: top-down, yoke in joined rounds, bodice worked flat in rows, skirt rejoined and worked in rounds; ch 1 at sc rows does not count, ch 2 at hdc rows counts as the first hdc, ch 3 at dc rows counts as the first dc
- Skill level: Intermediate
Yoke Pattern
The yoke begins at the neckline and is worked outward in joined rounds to the underarm. Work a magic ring, or ch 4 and join with sl st to form a ring.
Round 1 (RS): Ch 3 (counts as first dc), work 47 more dc into ring, join with sl st to top of beginning ch-3. (48 dc)
Round 2: Ch 3 (counts as first dc), dc into same st as join, 2 dc into each st around, join with sl st to top of beginning ch-3. (96 dc)
Round 3: Ch 3 (counts as first dc), dc into same st, dc into next st, (2 dc into next st, dc into next st) rep around to last st, 2 dc into last st, join with sl st to top of beginning ch-3. (144 dc)
Round 4: Ch 3 (counts as first dc), dc into same st, dc into next 2 sts, (2 dc into next st, dc into next 2 sts) rep around, join with sl st to top of beginning ch-3. (192 dc)
Place stitch markers to divide the yoke into 4 sections: front 52 sts, back 52 sts, left sleeve opening 44 sts, right sleeve opening 44 sts, for a total of 192 sts.
Round 5: Ch 3 (counts as first dc), dc into each st around, join. (192 dc)
Round 6: Ch 3, dc into same st, dc into next 5 sts, (2 dc into next st, dc into next 5 sts) rep around, join. (224 dc)
Round 7: Ch 3, dc into each st around, join. (224 dc)
Round 8: Ch 3, dc into same st, dc into next 6 sts, (2 dc into next st, dc into next 6 sts) rep around, join. (256 dc)
After Round 8, the yoke should measure approximately 3.5 inches or 9 cm from the centre ring to the outer edge.
Neckline Lace Fan Border
The neckline border is applied to the foundation ring edge. With RS facing, join yarn at any stitch along the neckline edge.
Border Round 1: Ch 1, sc evenly around neckline edge, placing 1 sc per dc of Round 1. Join with sl st to first sc. (48 sc)
Border Round 2 (Fan Lace): Ch 1, sc into first st, (sk 2 sts, work Fan Stitch into next st, sk 2 sts, sc into next st) rep around. Join with sl st to first sc. (8 fans, 8 sc)
Border Round 3: Sl st across to first ch-2 sp of first fan, ch 1, sc into same ch-2 sp, (ch 3, sc into next ch-2 sp) rep around, ending ch 3, join to first sc. (8 sc, 8 ch-3 sps)
Fasten off and weave in ends at the neckline.
Divide for Bodice
Count along the 256 sts of Round 8 and divide as follows: right front 52 sts, right armhole 26 sts (leave unworked for the sleeve opening), back 100 sts, left armhole 26 sts (leave unworked), left front 52 sts.
Starting at the right front, work across the 52 right front sts, ch 8 for the right underarm, sk the 26 right armhole sts, work across the 100 back sts, ch 8 for the left underarm, sk the 26 left armhole sts, and work across the 52 left front sts. That gives you 52 + 8 + 100 + 8 + 52 = 220 sts across for the bodice.
Bodice Pattern
The bodice is worked flat in hdc rows. The button placket runs vertically at the centre front, with buttons on the right placket band and buttonholes on the left.
Row 1 (RS): Ch 2 (counts as first hdc), hdc into each st and each ch across. Turn. (220 hdc)
Rows 2 to 10: Ch 2 (counts as first hdc), hdc into each st across. Turn. (220 hdc)
Row 11 (RS): Ch 2, hdc into next 53 sts, hdc2tog, hdc into next 108 sts, hdc2tog, hdc into next 54 sts. Turn. (218 hdc)
Rows 12 to 14: Ch 2, hdc into each st across. Turn. (218 hdc)
Row 15 (RS): Ch 2, hdc into next 52 sts, hdc2tog, hdc into next 108 sts, hdc2tog, hdc into next 52 sts. Turn. (216 hdc)
Rows 16 to 18: Ch 2, hdc into each st across. Turn. (216 hdc)
Do not fasten off. After Row 18, your piece should measure approximately 8 inches or 20 cm from neckline to current row. The cap sleeves are formed by the shaped edge of the yoke, and we will add the lace fan border around each cap sleeve opening in the finishing steps.
Waist Eyelet Round
Join the ends of Row 18 together at the centre front with a sl st, forming a joined round. Adjust the stitch count to 215 by skipping one stitch when joining.
Eyelet Round: Ch 2 (counts as hdc), hdc into next 2 sts, (ch 2, sk 2 sts, hdc into next 3 sts) 42 times, ch 2, sk 2, join with sl st to top of ch-2. (43 hdc-3 groups, 43 ch-2 eyelets)
Skirt Pattern
The right side of the work faces you throughout the skirt rounds. Join each round with a sl st to the top of the starting chain or first stitch unless otherwise noted.
Setup Round: Ch 1, sc into first st and each st and ch-sp around, working 1 sc per hdc and 2 sc per ch-2 sp. Join. (215 sc)
Increase Round: Ch 1, sc into each st around, placing 2 sc into one stitch at the side seam area. Join. (216 sc)
Skirt Round 1 (Shell Foundation): Ch 3 (counts as first dc), 2 dc into same st, sk 2 sts, sc into next st, sk 2 sts, (5 dc into next st, sk 2 sts, sc into next st, sk 2 sts) 17 times, 2 dc into same st as beg ch-3, join with sl st to top of ch-3. (18 shells, 18 sc)
Skirt Round 2: Sl st to centre dc of first shell, ch 1, sc into same st, ch 5, (sc into centre dc of next shell, ch 5) 17 times, join with sl st to first sc. (18 sc, 18 ch-5 sps)
Skirt Round 3: Ch 3, 4 dc into same st, sc into ch-5 sp, (5 dc into sc, sc into ch-5 sp) 17 times, join. (18 shells, 18 sc)
Skirt Round 4 (sc conversion with increase): Sl st into any dc, ch 1, sc into same st, sc into next 4 dc, sc into sc, (sc into next 5 dc, sc into sc) 17 times. Join. (216 sc)
Skirt Increase Round A: Ch 1, (sc into next 8 sts, 2 sc into next st) 24 times, join. (240 sc)
Skirt Round 5: Ch 3, 2 dc into same st, sk 2 sts, sc into next st, sk 2 sts, (5 dc into next st, sk 2 sts, sc into next st, sk 2 sts) 19 times, 2 dc into first st to complete shell, join. (20 shells, 20 sc)
Skirt Round 6: Sl st to centre dc of first shell, ch 1, sc into same st, ch 5, (sc into centre dc of next shell, ch 5) 19 times, join. (20 sc, 20 ch-5 sps)
Skirt Round 7: Ch 3, 4 dc into same sc, sc into ch-5 sp, (5 dc into next sc, sc into next ch-5 sp) 19 times, join. (20 shells, 20 sc)
Skirt Round 8: Sl st to centre dc of first shell, ch 1, sc into same st, ch 5, (sc into centre dc of next shell, ch 5) 19 times, join. (20 sc, 20 ch-5 sps)
Skirt Round 9 (sc conversion): Sl st into first dc, ch 1, sc into same st, sc into next 4 dc, sc into sc, (sc into next 5 dc, sc into sc) 19 times, join. (240 sc)
Skirt Increase Round B: Ch 1, (sc into next 9 sts, 2 sc into next st) 24 times, join. (264 sc)
Skirt Round 10: Ch 3, 2 dc into same st, sk 2 sts, sc into next st, sk 2 sts, (5 dc into next st, sk 2 sts, sc into next st, sk 2 sts) 21 times, 2 dc into first st to complete shell, join. (22 shells, 22 sc)
Skirt Round 11: Sl st to centre dc of first shell, ch 1, sc into same st, ch 5, (sc into centre dc of next shell, ch 5) 21 times, join. (22 sc, 22 ch-5 sps)
Skirt Round 12: Ch 3, 4 dc into same sc, sc into ch-5 sp, (5 dc into next sc, sc into next ch-5 sp) 21 times, join. (22 shells, 22 sc)
Skirt Round 13: Sl st to centre dc of first shell, ch 1, sc into same st, ch 5, (sc into centre dc of next shell, ch 5) 21 times, join. (22 sc, 22 ch-5 sps)
Skirt Round 14 (sc conversion): Sl st into first dc, ch 1, sc into same st, sc into next 4 dc, sc into sc, (sc into next 5 dc, sc into sc) 21 times, join. (264 sc)
Skirt Round 15: Ch 3, 2 dc into same st, sk 2 sts, sc into next st, sk 2 sts, (5 dc into next st, sk 2 sts, sc into next st, sk 2 sts) 21 times, 2 dc into first st, join. (22 shells, 22 sc)
Skirt Round 16: Sl st to centre dc, ch 1, sc into same st, ch 5, (sc into centre dc of next shell, ch 5) 21 times, join. (22 sc, 22 ch-5 sps)
Continue with the scallop edging from the Special Stitches section around the hem, then fasten off.
Finishing & Assembly
Apply the lace fan border around each cap sleeve opening, following the same fan stitch steps we used at the neckline: attach yarn at the opening, ch 1, sc into the first stitch, then repeat (sk 2 sts, work Fan Stitch into next st, sk 2 sts, sc into next st) around the opening.
Wet block the finished dress on a blocking mat, pinning the skirt scallops into shape and gently stretching them to show off the lace pattern. Allow it to dry completely before removing the pins.
Thread the satin ribbon through the waist eyelets, weaving in and out, centre the ribbon ends at the front, and tie a pretty bow. Sew the decorative buttons along the front placket, spacing them evenly. Weave in all remaining ends with your tapestry needle.
Tips
For smaller sizes, stop the yoke one round earlier and reduce the bodice rows by 2 to 4 rows. The pattern notes also suggest working fewer skirt rounds for a shorter dress.
Count your stitches at the end of each round during the yoke and the skirt increase rounds. The shell pattern is easy to follow once the counts are right, and catching a mistake early saves so much time.
Choose a smooth yarn with good drape for the skirt, and avoid overly fuzzy or textured yarns, which will hide the shell and fan stitch detail.
Peach Blossom Crochet Toddler Dress Free Pattern
Materials
Steps
- Work the circular yoke in 8 rounds up to 256 sts
- Add the 3-round lace fan border at the neckline
- Divide the yoke and work the hdc bodice rows to Row 18
- Join in the round and work the waist eyelet round
- Work the shell lace skirt with its two increase rounds up to 22 shells
- Finish with scallop hem edging, sleeve borders, ribbon and buttons
- Wet block, pinning the skirt scallops into shape
- Try the dress on as you go; the top-down construction makes fitting easy
- Count stitches at the end of every yoke and skirt round
- Use a smooth yarn so the shell and fan stitches stay crisp
- Block before threading the ribbon so the waist eyelets sit evenly


