Sage and Cream Granny Square Baby Overalls Free Pattern

Table of Contents
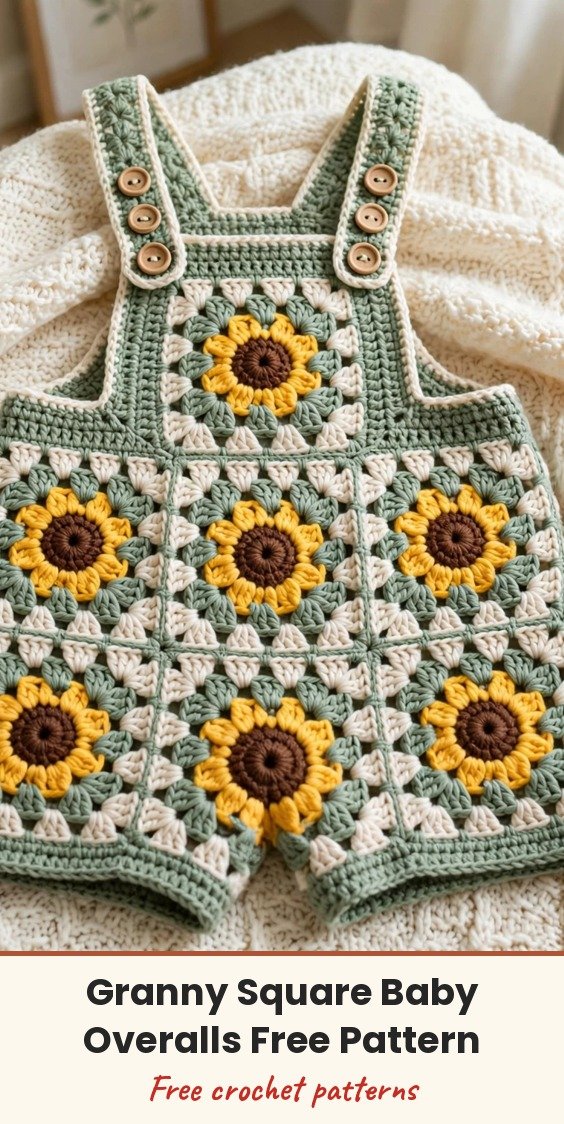
These sage and cream overalls are made from the sweetest sunflower granny squares, and I love how simple the construction is! We will make 20 squares in sage green, cream and warm taupe, join them flat into panels, then add ribbed cuffs, crocheted straps and wooden buttons.
Two squares across the bib front, two across the bib back, four for each leg, plus side panels — the grid does all the shaping for us. The result is a cozy, textured romper perfect for babies around 6 to 12 months old.
This is an intermediate pattern, but if you can crochet a granny square and follow a simple assembly order, you can absolutely make these. Block your first square and measure it before you go on — gauge is critical here!
Materials
- Approximately 220 yards worsted weight yarn (category 4) in Color A: sage green
- Approximately 220 yards worsted weight yarn (category 4) in Color B: cream or off-white
- Approximately 80 yards worsted weight yarn (category 4) in Color C: warm taupe or mushroom
- US G-6 / 4.0mm crochet hook
- Yarn needle for weaving ends and joining
- 2 wooden buttons, 3/4 inch diameter
- Scissors
- Locking stitch markers
- Pins for blocking
Abbreviations
- ch: chain
- sl st: slip stitch
- sc: single crochet
- dc: double crochet
- hdc: half double crochet
- sp: space
- ch-sp: chain space
- sk: skip
- st/sts: stitch(es)
- rep: repeat
- pm: place marker
- BLO: back loop only
- RS/WS: right side / wrong side
Special Stitches
- Flat Join Method: with RS of two squares facing up and held together, insert hook through corresponding corner or edge stitches of both squares simultaneously and join with sl st through both layers, working along the edge stitch for stitch. This creates a visible but flat ridge on the WS.
- Ribbed Cuff: worked in rows of sc in BLO, then seamed into a ring — the back-loop rows create the stretchy ribbed texture.
Gauge & Size
- Finished size: 6 to 12 months; chest circumference approximately 18 inches; bib width approximately 6 inches; total length from shoulder to ankle approximately 19 inches; inseam approximately 7 inches
- Gauge: one completed granny square (after 5 rounds) = 3 inches by 3 inches after light blocking; 18 sc by 20 rows = 4 inches in sc with the 4.0mm hook
- Construction: 20 granny squares joined with the flat join into bib, side and leg panels; ribbed cuffs and straps added; for rows of sc, ch 1 does not count as a stitch, and for rows of dc, ch 3 counts as first dc unless noted
- Skill level: Intermediate
Sunflower Granny Square (Make 20)
Round 1 (Petal Round, Color C): Make a magic ring (or ch 4, join with sl st to form ring). Ch 1 (does not count as st), work 16 sc into the ring, join with sl st to first sc. (16 sc)
Round 2 (Petal Tops, Color C): Ch 1, (sc in next sc, ch 3, sk 1 sc) 8 times, join with sl st to first sc. (8 sc, 8 ch-3 loops forming petals)
The ch-3 loops form the sunflower petals. Fasten off Color C after this round and weave in the end.
Round 3 (First Shell Round): Join the round colour with a sl st in any ch-3 petal loop. Ch 3 (counts as first dc), work 2 dc in same ch-3 sp (half corner begun), ch 2, 3 dc in same sp (corner made), ch 1, (3 dc in next ch-3 sp, ch 1) 1 time, then in next ch-3 sp: 3 dc, ch 2, 3 dc (corner), ch 1, (3 dc in next ch-3 sp, ch 1) 1 time. Repeat corner, ch 1, side shell, ch 1 two more times to complete 4 corners and 4 sides. Join with sl st to top of beginning ch-3. (36 dc total: 4 corner groups of (3 dc, ch 2, 3 dc) = 24 dc with 4 ch-2 corner sps, and 4 side groups of 3 dc = 12 dc with 4 ch-1 side sps)
Fasten off the round colour.
Round 4 (Second Shell Round): Join the round colour with sl st in any ch-2 corner sp. Ch 3 (counts as first dc), 2 dc in same sp, ch 2, 3 dc in same sp (corner), ch 1, 3 dc in next ch-1 side sp, ch 1, [3 dc, ch 2, 3 dc in next ch-2 corner sp, ch 1, 3 dc in next ch-1 side sp, ch 1] rep 3 more times. Join with sl st to top of beginning ch-3. (4 corner groups, 8 side groups, total 12 shell groups of 3 dc = 36 dc, 8 ch-1 sps, 4 ch-2 corner sps)
Fasten off the round colour.
Round 5 (Finishing Round): Join the round colour with sl st in any ch-2 corner sp. Ch 1, (sc, ch 2, sc) in corner sp (corner made), sc in each dc and in each ch-1 sp across to next corner sp, rep for all 4 sides. Each side has 3 dc group + 1 ch-1 sp + 3 dc group + 1 ch-1 sp + 3 dc group = 11 sts across each side between corner sts. Work (sc, ch 2, sc) at each corner, sc in each of 11 sts across each side. Join with sl st to first sc. (48 sc total plus 4 ch-2 corner sps)
Fasten off and weave in all ends. The completed square should measure 3 inches by 3 inches after light blocking.
Group 1 squares (make 10): Rounds 1 and 2 in Color C (taupe center petals), Round 3 in Color A (sage green), Round 4 in Color B (cream), Round 5 in Color A (sage green).
Group 2 squares (make 10): Rounds 1 and 2 in Color C (taupe center petals), Round 3 in Color B (cream), Round 4 in Color A (sage green), Round 5 in Color B (cream).
Block all 20 squares to 3 inches by 3 inches and label them Group 1 and Group 2 with removable markers.
Assembling the Panels
Bib front panel (2 squares wide by 2 squares tall): arrange top-left Group 1, top-right Group 2, bottom-left Group 2, bottom-right Group 1. Join top-left and top-right squares along their shared vertical edge with the flat join, working sl st through corresponding sc sts on the Round 5 edges of both squares (11 sl sts along the edge between corner sts). Join bottom-left and bottom-right in the same way (11 sl sts). Join the top row to the bottom row along their shared horizontal edge, matching corners (11 sl sts plus corner joins). The panel measures approximately 6 inches wide by 6 inches tall.
Bib back panel (2 by 2): arrange top-left Group 2, top-right Group 1, bottom-left Group 1, bottom-right Group 2, and join in the same sequence as the bib front (11 sl sts per edge plus corners). The panel measures approximately 6 inches by 6 inches.
Left leg panel (2 by 2): arrange top-left Group 2, top-right Group 1, bottom-left Group 1, bottom-right Group 2, and join following the same steps. Approximately 6 inches wide by 6 inches tall.
Right leg panel (2 by 2): arrange top-left Group 1, top-right Group 2, bottom-left Group 2, bottom-right Group 1, and join following the same steps. Approximately 6 inches wide by 6 inches tall.
Side panels: you have 4 remaining squares (2 Group 1, 2 Group 2). Make two side panels, each 1 square wide by 2 squares tall. Left side panel: top Group 1, bottom Group 2, joined along the horizontal shared edge (11 sl sts) — approximately 3 inches wide by 6 inches tall. Right side panel: top Group 2, bottom Group 1, joined the same way (11 sl sts).
Joining the Body & Legs
Lay the panels out flat in this order: [Left Side Panel] [Bib Front Panel] [Right Side Panel] [Bib Back Panel] — this strip wraps around the baby’s body.
Step 1: Join the right edge of the Left Side Panel to the left edge of the Bib Front Panel with a sl st flat join along the full 6 inch edge. (22 sl sts)
Step 2: Join the right edge of the Bib Front Panel to the left edge of the Right Side Panel. (22 sl sts)
Step 3: Join the right edge of the Right Side Panel to the left edge of the Bib Back Panel. (22 sl sts)
Step 4: Join the right edge of the Bib Back Panel to the left edge of the Left Side Panel, forming a tube. (22 sl sts)
Checkpoint: the body is now a tube measuring approximately 18 inches in circumference and 6 inches tall.
Mark the center bottom of the bib front panel and the center bottom of the bib back panel with stitch markers. Attach the Left Leg Panel: align its top edge with the left half of the body tube bottom edge — left front seam: join left 3 inches of front bottom to left edge of left leg panel (11 sl sts); left back seam: join left 3 inches of back bottom to right edge of left leg panel (11 sl sts). Attach the Right Leg Panel the same way: right front seam (11 sl sts) and right back seam (11 sl sts).
Seam the inner leg (crotch): join the center front bottom edge to the center back bottom edge with a yarn needle and mattress stitch or sl st seam, working through both layers (approximately 11 sts each side). Close the left leg tube: join the left edge of the Left Leg Panel to the right edge of the Left Leg Panel along the full 6 inch vertical seam (22 sl sts). Close the right leg tube the same way (22 sl sts).
Checkpoint: the garment body should measure approximately 12 inches from the top of the bib to the bottom of the leg panels.
Ribbed Cuffs (Make 2)
Using Color B and the 4.0mm hook, ch 9 for the cuff shown (the general ribbed cuff starts ch 13 for 12 sc; for these leg cuffs the pattern works an 8 sc cuff).
Foundation row: Ch 9, sc in 2nd ch from hook and in each ch across. (8 sc)
Row 1: Ch 1, turn, sc in BLO of each sc across. (8 sc)
Repeat Row 1 until the cuff measures approximately 12 inches in length (approximately 50 to 54 rows). Do not fasten off.
Join the cuff into a ring: sl st through the last row and the foundation chain end to seam into a ring. Attach the cuff to the leg opening: hold the cuff with RS facing out, align the long outer edge of the cuff with the bottom edge of the leg panel, and using Color B, sc the cuff to the leg panel through both layers, spacing stitches evenly around the leg opening (approximately 1 sc per row end of cuff). Join with sl st, fasten off and weave in ends. Repeat for the second leg.
Checkpoint: after attaching both cuffs, the garment should measure approximately 13.5 inches from top of bib to bottom of cuffs.
Top Edge Border
Using Color A and the 4.0mm hook, work sc across the 2 top squares of the front bib. Each square top edge has 11 sc (from Round 5) plus 1 corner sc at each end = 13 sc per square; across 2 squares with the shared center corner combined: (13 + 11) = 24 sc along the front bib top. Ch 1, sc in each of 24 sc across. Fasten off. Repeat for the back bib (24 sc across).
Straps (Make 2)
Using Color A and the 4.0mm hook, ch 9.
Foundation row: Sc in 2nd ch from hook and in each ch across. (8 sc)
Row 1: Ch 1, turn, sc in BLO of each sc across. (8 sc)
Row 2: Ch 1, turn, sc in BLO of each sc across. (8 sc)
Repeat Rows 1 and 2 until the strap measures approximately 10 inches from the foundation. Do not fasten off.
Button loop: Ch 5, sl st in first ch to form a loop. Fasten off. Make the second strap identical.
Finishing & Assembly
Identify the two top back corners of the back bib panel. Using a yarn needle and Color A, sew the foundation chain end of each strap securely to the top back corners of the back bib, working several passes through the strap and bib edge to secure firmly. Bring each strap up over the shoulder and down the front of the bib. Mark button placement on the front bib approximately 0.75 inch from the top edge and approximately 1.5 inches from each side edge, and sew one wooden button at each marked placement on the front bib RS. Loop the button loop of each strap over the corresponding wooden button to close.
Checkpoint: the overall length from the top of the strap over the shoulder down to the bottom of the cuffs should measure approximately 19 inches.
Weave in all remaining yarn ends securely, locking ends within the back of the granny square stitching. To block, submerge the garment in cool water with a little gentle wool wash or baby-safe soap, press out excess water by rolling in a clean towel, lay flat on a blocking mat and pin each square to its 3 inch dimensions, smoothing corners square, and allow to dry fully (12 to 24 hours). Once dry, check all seams and strap attachments and reinforce any loose joins.
Tips
Block each square before assembly — it makes the flat joins line up beautifully and the finished garment look so polished.
Give yourself plenty of time for the assembly; it takes longer than you might expect, but it is very satisfying.
Machine wash on a gentle cycle in cold water if using superwash or acrylic yarn, lay flat to dry, and check button attachments before each use.
To size up to 12 to 18 months, work each square to 3.5 inches by adding one additional round before joining; for 0 to 6 months, stop one round earlier for 2.5 inch squares and shorten the straps by 1 inch.
Sage and Cream Granny Square Baby Overalls Free Pattern
Materials
Steps
- Make 20 sunflower granny squares in 5 rounds (10 Group 1, 10 Group 2)
- Block all squares to 3 inches and label the groups
- Flat-join squares into bib front, bib back, two leg panels and two side panels
- Join the panels into a body tube (22 sl sts per seam) and attach the leg panels
- Work 2 ribbed cuffs and attach them to the leg openings
- Work the top edge borders (24 sc per bib)
- Make 2 straps with button loops, sew them to the back bib and add the wooden buttons
- Block the finished overalls and check all seams
- Block every square before assembly so the joins line up
- Gauge is critical — measure your first square before making all 20
- Allow plenty of time for assembly; it takes longer than expected
- Check button attachments before each use on a baby


