Bunny Rabbit Hooded Baby Poncho Free Crochet Pattern
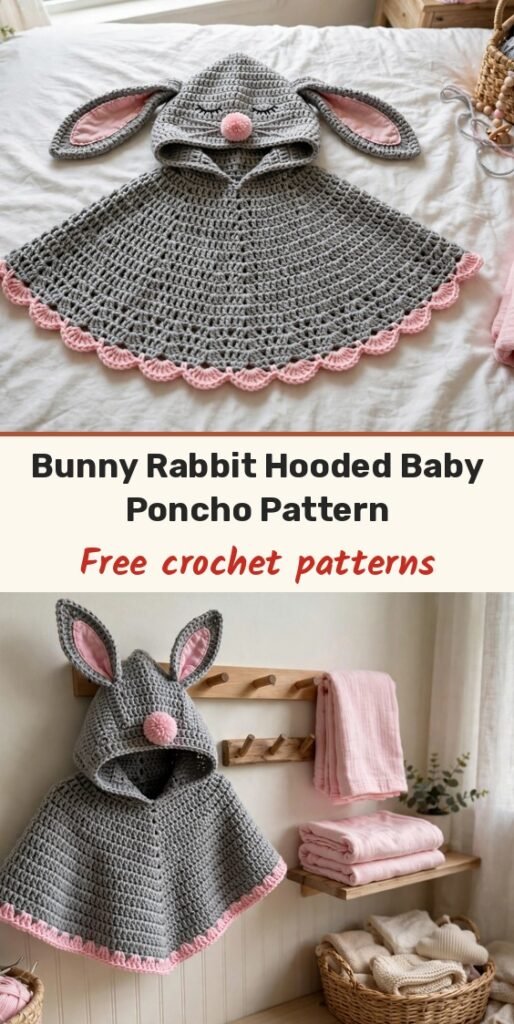
Table of Contents
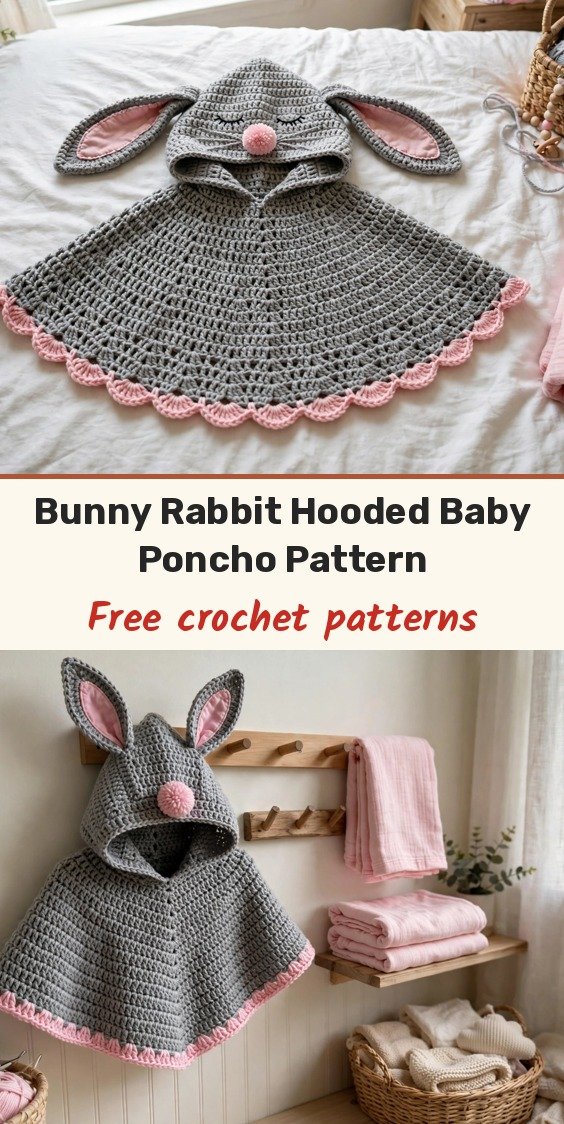
This bunny rabbit hooded poncho is pure baby-shower magic! It is sized for 6 to 12 months, uses single crochet for the body, simple increases for shaping, and a sweet shell stitch border, and the hood has floppy bunny ears with pink linings and an embroidered face.
If you can work single crochet and follow a basic increase pattern, you can absolutely make this. The construction is straightforward: two triangular panels, one rectangular hood, four ear pieces, and some adorable finishing details. The pretty V-ridge running down the front and back happens all by itself from the center increases.
The poncho shape means easy on and off over a wiggly baby, with no button bands or zippers to fuss with, and the hood keeps little heads warm while the ears add all the personality. Plan for about 8 to 12 hours of happy crocheting.
Materials
- Approximately 300 yards worsted weight yarn (category 4) in grey (Yarn A, main colour)
- Approximately 80 yards worsted weight yarn (category 4) in light pink (Yarn B, contrast colour)
- Small amount of brown or dark grey yarn for the embroidered face
- 6.0 mm (US J-10) crochet hook
- 4 stitch markers
- Yarn needle for seaming and weaving ends
- Scissors
- 1 pink pom-pom, approximately 1 inch diameter (or yarn to make one)
- Optional: a tiny amount of polyester fiberfill for the ears
Abbreviations
- ch: chain
- sl st: slip stitch
- sc: single crochet
- hdc: half double crochet
- dc: double crochet
- inc: single crochet increase, work 2 sc into the same stitch
- dec: single crochet decrease (sc2tog)
- st(s): stitch(es)
- RS: right side
- WS: wrong side
- rnd: round
Special Stitches
- Shell stitch: work 5 double crochet into one stitch. This creates a pretty fan shape. For the shell edging, skip 2 stitches before each shell and skip 2 stitches after, then single crochet into the next stitch before repeating.
Gauge & Size
- Finished size: baby 6 to 12 months; poncho width (shoulder to hem) approximately 13 inches, hem circumference approximately 40 inches, hood height approximately 7 inches, neck opening approximately 13 inches around
- Gauge: 16 sc by 18 rows = 4 inches, worked flat, after light blocking
- Construction: two flat triangular panels seamed at the shoulders, separate rectangular hood folded and seamed, ears worked in the round and sewn on
- Skill level: Intermediate (a confident beginner can do it)
Two pattern notes before we start: the ch 1 at the beginning of each row is a turning chain only and does not count as a stitch, and you turn your work at the end of every row unless told to join in the round. From Row 3 onward, every row increases by 4 stitches total: one at each outer edge and two in the center, and those two center increases create the lovely double ridge down the front.
Front Panel
Foundation chain: Using Yarn A and the 6.0 mm hook, ch 35.
Row 1 (RS): Starting in 2nd ch from hook, sc across. Turn. (34 sc)
Row 2: Ch 1, inc in first st, sc to last st, inc in last st. Turn. (36 sc)
Row 3: Ch 1, inc in first st, sc 15, inc in next st, inc in next st, sc 15, inc in last st. Turn. (40 sc)
Row 4: Ch 1, inc in first st, sc 17, inc in next st, inc in next st, sc 17, inc in last st. Turn. (44 sc)
Row 5: Ch 1, inc in first st, sc 19, inc in next st, inc in next st, sc 19, inc in last st. Turn. (48 sc)
Row 6: Ch 1, inc in first st, sc 21, inc in next st, inc in next st, sc 21, inc in last st. Turn. (52 sc)
Row 7: Ch 1, inc in first st, sc 23, inc in next st, inc in next st, sc 23, inc in last st. Turn. (56 sc)
Row 8: Ch 1, inc in first st, sc 25, inc in next st, inc in next st, sc 25, inc in last st. Turn. (60 sc)
Row 9: Ch 1, inc in first st, sc 27, inc in next st, inc in next st, sc 27, inc in last st. Turn. (64 sc)
Row 10: Ch 1, inc in first st, sc 29, inc in next st, inc in next st, sc 29, inc in last st. Turn. (68 sc)
Row 11: Ch 1, inc in first st, sc 31, inc in next st, inc in next st, sc 31, inc in last st. Turn. (72 sc)
Row 12: Ch 1, inc in first st, sc 33, inc in next st, inc in next st, sc 33, inc in last st. Turn. (76 sc)
Row 13: Ch 1, inc in first st, sc 35, inc in next st, inc in next st, sc 35, inc in last st. Turn. (80 sc)
Row 14: Ch 1, inc in first st, sc 37, inc in next st, inc in next st, sc 37, inc in last st. Turn. (84 sc)
Row 15: Ch 1, inc in first st, sc 39, inc in next st, inc in next st, sc 39, inc in last st. Turn. (88 sc)
Row 16: Ch 1, inc in first st, sc 41, inc in next st, inc in next st, sc 41, inc in last st. Turn. (92 sc)
Row 17: Ch 1, inc in first st, sc 43, inc in next st, inc in next st, sc 43, inc in last st. Turn. (96 sc)
Row 18: Ch 1, inc in first st, sc 45, inc in next st, inc in next st, sc 45, inc in last st. Turn. (100 sc)
Row 19: Ch 1, inc in first st, sc 47, inc in next st, inc in next st, sc 47, inc in last st. Turn. (104 sc)
Row 20: Ch 1, inc in first st, sc 49, inc in next st, inc in next st, sc 49, inc in last st. Turn. (108 sc)
Row 21: Ch 1, inc in first st, sc 51, inc in next st, inc in next st, sc 51, inc in last st. Turn. (112 sc)
Row 22: Ch 1, inc in first st, sc 53, inc in next st, inc in next st, sc 53, inc in last st. Turn. (116 sc)
Row 23: Ch 1, inc in first st, sc 55, inc in next st, inc in next st, sc 55, inc in last st. Turn. (120 sc)
Row 24: Ch 1, inc in first st, sc 57, inc in next st, inc in next st, sc 57, inc in last st. Turn. (124 sc)
Row 25: Ch 1, inc in first st, sc 59, inc in next st, inc in next st, sc 59, inc in last st. Turn. (128 sc)
Row 26: Ch 1, inc in first st, sc 61, inc in next st, inc in next st, sc 61, inc in last st. Turn. (132 sc)
Row 27: Ch 1, inc in first st, sc 63, inc in next st, inc in next st, sc 63, inc in last st. Turn. (136 sc)
Row 28: Ch 1, inc in first st, sc 65, inc in next st, inc in next st, sc 65, inc in last st. Turn. (140 sc)
Row 29: Ch 1, inc in first st, sc 67, inc in next st, inc in next st, sc 67, inc in last st. Turn. (144 sc)
Row 30: Ch 1, inc in first st, sc 69, inc in next st, inc in next st, sc 69, inc in last st. Turn. (148 sc)
Checkpoint: after Row 18 your panel should measure approximately 4 inches from the foundation chain to the working edge and about 25 inches across the bottom edge, and the triangular shape should be obvious. At the end of Row 30, fasten off Yarn A, leaving a long tail of at least 18 inches for seaming. The finished panel measures about 6.5 to 7 inches from foundation edge to working edge and about 37 inches across the bottom.
Back Panel
Work exactly as the front panel: foundation chain of 35, Rows 1 through 30, all stitch counts identical. The poncho is symmetrical front to back. Fasten off with a long tail for seaming.
Joining the Panels
Place the front and back panels together with right sides facing each other. The foundation chain edges (the short straight edges at the top, 34 stitches each) become the shoulder seams.
Using Yarn A and a yarn needle, seam the right shoulder: mattress stitch or whipstitch the first 8 stitches of each foundation chain edge together, then fasten off. Seam the left shoulder the same way, joining the last 8 stitches of each edge.
The center 18 stitches on each side remain open and form the neck opening, approximately 13 inches in circumference. Hold the poncho up by the neck opening: the triangles should drape symmetrically. If the neck feels too tight, remove 1 to 2 shoulder stitches from each seam to widen it before you continue.
Hood
Foundation chain: Using Yarn A, ch 55.
Row 1 (RS): Starting in 2nd ch from hook, sc across. Turn. (54 sc)
Rows 2 through 28: Ch 1, sc across each row without shaping. Turn. (54 sc per row)
After Row 28 the hood rectangle measures approximately 6 inches wide and 6.2 inches tall. Fasten off, leaving a long tail for seaming. Fold the rectangle in half so the two short ends meet, and seam along the top folded edge with a whipstitch, joining both layers for the full 54-stitch width. This creates the rounded crown. Turn the hood right side out.
To attach the hood, pin it around the neck opening, aligning the bottom open edge of the hood with the neck opening and the hood opening facing forward. Whipstitch the hood edge evenly around the neck opening with Yarn A, distributing any ease evenly. The join should lie flat and the hood should stand up naturally.
Bunny Ears
Make 2 outer ear pieces in Yarn A and 2 inner ear pieces in Yarn B. Each ear starts with a chain of 4 and is worked as a continuous oval.
Outer Ear Round 1: Starting in 2nd ch from hook, sc 2, 3 sc in last ch (working around the tip), then working back along the other side of the foundation chain: sc 1, 3 sc in first ch. Join with sl st to first sc. (9 sc)
Outer Ear Round 2: Ch 1, sc 1, inc, sc 1, inc, inc, inc, sc 1, inc, inc. Join. (15 sc)
Outer Ear Round 3: Ch 1, sc 2, inc, sc 2, inc, sc 1, inc, sc 2, inc, sc 1, inc. Join. (20 sc)
Outer Ear Rounds 4 through 10: Ch 1, sc across without increasing. Join. (20 sc per round)
Fasten off and set aside.
Inner Ear Round 1: Starting in 2nd ch from hook, sc 2, 3 sc in last ch, sc 1, 3 sc in first ch. Join. (9 sc)
Inner Ear Round 2: Ch 1, sc 1, inc, sc 1, inc, inc, inc, sc 1, inc, inc. Join. (15 sc)
Inner Ear Round 3: Ch 1, sc 2, inc, sc 2, inc, sc 1, inc, sc 2, inc, sc 1, inc. Join. (20 sc)
Inner Ear Rounds 4 through 7: Ch 1, sc around without increasing. Join. (20 sc per round)
Fasten off. The inner ears are slightly shorter than the outer ears, and that is correct.
To assemble each ear, hold one outer ear and one inner ear together with the pink side facing up. Using Yarn B and a yarn needle, whipstitch around the perimeter of both pieces, leaving the flat base open. Lightly stuff with a tiny pinch of fiberfill if you like, then close the base seam.
Position the ears at the top of the hood, one on each side, centered over the crown seam and approximately 1.5 inches apart at their bases, angled very slightly outward. Sew each ear securely through the hood fabric with Yarn A, using several passes so they do not flop.
Face & Edging
Nose: sew or glue the pink pom-pom to the center front of the hood, approximately 1 inch above the hood opening edge.
Eyes: using brown or dark grey yarn, embroider two small circles or French knots approximately 0.75 inches above and 1 inch to each side of the nose position.
Mouth: embroider a small Y-shaped or inverted-V line descending from just below the nose, no longer than 0.5 inches. Keep it subtle and sweet.
Hem edging: join Yarn B with a sl st at the right-hand side point of the front panel hem. Work: sc in first st, sk 2 sts, 5 dc in next st (shell made), sk 2 sts, repeat across to the corner, ending with sc in the last st. Work sc into the corners, then continue the pattern up the side edges and across the back hem. Join with sl st to the first sc and fasten off Yarn B.
Hood opening edging: using Yarn B, join with a sl st at the bottom edge of the hood opening. Round 1: work 1 round of sc evenly around the entire hood opening edge. Round 2: sc in first st, sk 2, shell (5 dc in next st), sk 2, repeat around, ending with sc, sl st to first sc. Fasten off Yarn B.
Finishing & Assembly
Weave in all yarn ends securely, working tails through at least 5 to 6 stitches in multiple directions before trimming.
For acrylic yarns, pin the poncho flat to a blocking mat, mist lightly with water, pat into shape and let it air dry completely (do not steam block acrylic). For wool, wet block by soaking in cool water for 10 minutes, pressing out the water gently in a towel, then pinning flat to dry. Pin the ears open flat during blocking so they keep their shape.
Tips
For a 12 to 18 month size, add 8 to 10 more rows to each panel (Rows 31 through 38 or 40), keeping the same 4-stitch increase per row. For 18 to 24 months, add 16 to 18 more rows.
For a wider neck opening, add 2 to 4 stitches to the center of the foundation chain (ch 37 or ch 39 instead of 35) and adjust the shoulder seam stitch counts proportionally.
Care: machine wash cold on a gentle cycle with superwash wool or acrylic, lay flat to dry or use an air-only setting, and do not iron. Store folded flat.
Bunny Rabbit Hooded Baby Poncho Free Crochet Pattern
Materials
Steps
- Work the front triangular panel from a ch 35 foundation, increasing to 148 sc by Row 30
- Work the back panel identically
- Seam 8 stitches at each shoulder, leaving the center 18 sts open for the neck
- Crochet the hood rectangle (54 sc by 28 rows), fold and seam the crown
- Attach the hood around the neck opening
- Make 2 outer ears and 2 inner ears in the round and layer them together
- Sew the ears to the hood and add the pom-pom nose and embroidered face
- Finish with pink shell edging around the hem and hood opening
- The ch 1 turning chain does not count as a stitch, all counts are actual sc stitches
- Leave at least an 18 inch tail when fastening off each panel for seaming
- Use smooth yarns so the clean stitch lines and center ridge stay visible


