Sunshine Yellow Butterfly Baby Dress Free Crochet Pattern
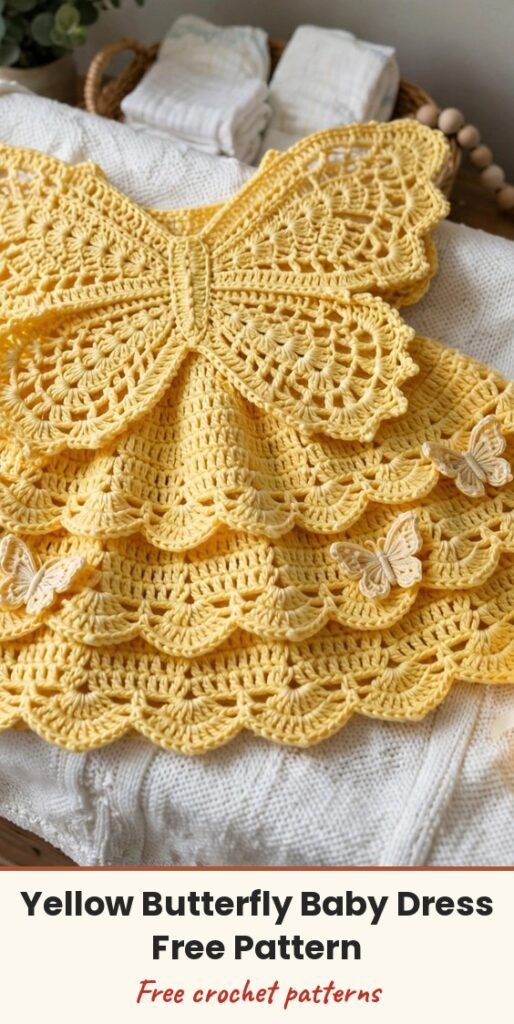
Table of Contents
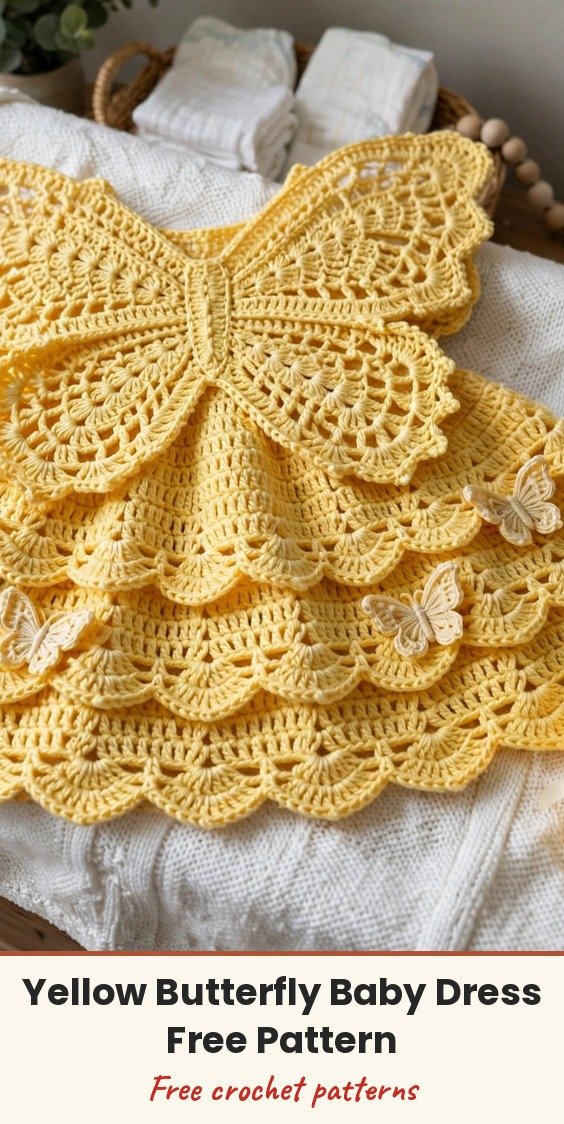
Looking for a show-stopping handmade gift for a new baby? This sunshine yellow butterfly dress is pure joy! A big, beautiful butterfly forms the whole bodice — wings, bib and shoulder straps in one piece — and below it a tiered skirt floats down to a scalloped shell hem, with two tiny butterflies fluttering on the skirt and matching booties to finish the set.
We will start with the butterfly medallion and work the wings outward from the centre ring, then build the skirt in tiers straight from the butterfly’s waist edge. The skirt itself is wonderfully straightforward; the butterfly asks for a little concentration, but I walk you through every row with stitch counts. The written size is 3 to 6 months, with (newborn to 3 months, 3 to 6 months, 6 to 12 months) adjustments noted where they differ.
Materials
- 350 (300, 400) yards of light DK or light worsted cotton yarn in pale yellow
- 20 yards of white yarn, for the applique butterfly detail lines
- 3.5mm crochet hook, for the bodice and appliques
- 3.75mm crochet hook, for the skirt and booties
- 7 to 9 pearl shank buttons, 10mm diameter
- Sewing needle and matching thread, for the buttons
- Tapestry needle, for weaving in ends
- Stitch markers, at least 6
- Measuring tape
- 2 lengths of cream or ivory satin ribbon, 18 inches each, for the booties
Abbreviations
- ch: chain
- ch-sp: chain space
- sc: single crochet
- hdc: half double crochet
- dc: double crochet
- dc2tog: double crochet two together
- sc2tog: single crochet two together
- tr: treble crochet
- sl st: slip stitch
- BLO: back loop only
- st/sts: stitch / stitches
- RS: right side
- WS: wrong side
Special Stitches
- Shell: work 6 dc all in the same stitch or space.
- Picot: ch 3, sl st in the first chain made.
- 3-dc bobble: yarn over, insert hook in the indicated stitch, pull up a loop, yarn over and pull through 2 loops. Repeat twice more in the same stitch so you have 4 loops on the hook, then yarn over and pull through all 4 loops.
- V-stitch: work (dc, ch 2, dc) all in the same stitch or space.
- Foundation single crochet (FSC): make a slip knot, ch 2, insert the hook in the 2nd chain from the hook, pull up a loop, yarn over and pull through 1 loop (chain made), yarn over and pull through both loops (sc made). For each next FSC, insert the hook under the 2 strands of the chain bottom of the previous stitch and repeat.
Gauge & Size
- Finished size: chest 14 (16, 18) inches for newborn to 3 months (3 to 6 months, 6 to 12 months); length from bodice to hem 11 (12.5, 14) inches; bootie foot length 3.5 inches for all sizes
- Gauge: 18 sc x 20 rows = 4 inches with the 3.5mm hook; 16 sc x 18 rows = 4 inches with the 3.75mm hook; one 6-dc shell over 6 stitches is about 1.5 inches wide
- Construction: butterfly bodice worked as a medallion with shaped wings, skirt worked in tiers from the waist edge, back button bands added, booties worked in rounds
- Skill level: Advanced Beginner to Intermediate
Butterfly Bodice Pattern
Work with the 3.5mm hook in the main colour. Mark the right side of the butterfly with a locking stitch marker on Round 1.
Round 1 (RS): Make a magic ring, ch 3 (counts as dc), 11 dc in the ring, sl st to the top of the beginning ch-3 to join, pull the ring closed. (12 dc)
Round 2: Ch 3 (counts as dc), dc in the same stitch, 2 dc in each stitch around, sl st to join. (24 dc)
Round 3: Ch 3 (counts as dc), dc in the same stitch, dc in the next stitch, (2 dc in the next stitch, dc in the next stitch) repeated around, sl st to join. (36 dc)
Round 4: Ch 1 (does not count as a stitch), sc in the same stitch, (ch 3, sk 2 sts, sc in the next stitch) repeated around, ending with ch 3, sl st to the first sc to join. (12 ch-3 spaces)
Round 5: Sl st into the first ch-3 space, ch 3 (counts as dc), 4 dc in the same space, ch 1, (5 dc in the next ch-3 space, ch 1) repeated around, sl st to the top of the beginning ch-3 to join. (12 groups of 5 dc with ch-1 between; 60 dc plus 12 ch-1 spaces)
Round 6: Sl st to the centre (3rd) dc of the first 5-dc group, ch 1, sc in the same stitch, (ch 5, sc in the centre dc of the next 5-dc group) repeated around, ch 5, sl st to the first sc to join. (12 sc and 12 ch-5 loops)
This completes the centre medallion. Hold it with the magic ring tail at the bottom and number the 12 ch-5 loops clockwise from the top: loops 1 and 2 anchor the upper right wing, loops 3 to 6 are the right side bridge, loops 7 and 8 anchor the lower right wing, loops 9 and 10 anchor the lower left wing, and loops 11 and 12 anchor the upper left wing.
Upper Wings
Upper Right Wing Row 1 (RS): Attach the yarn with a sl st to the sc between loop 12 and loop 1. Ch 4 (counts as tr), work (tr, ch 2, 2 tr) in the same sc junction point, ch 3, sc in loop 1, ch 3, sc in loop 2, ch 3, turn. (2 anchor sc, ch-3 bridges)
Upper Right Wing Row 2 (WS): Ch 1, sc in the first sc, ch 3, sc in the next sc, ch 3, (2 tr, ch 2, 2 tr) in the ch-2 space, ch 3, sc in the same junction sc as the Row 1 base, ch 1, turn.
Upper Right Wing Row 3 (RS): Sc in the first sc, ch 3, (sc, ch 3, sc) in the ch-2 space, ch 3, sc in the next sc, ch 3, sc in the next sc, ch 3, sc in the last sc, turn. (5 ch-3 arches)
Upper Right Wing Row 4 (WS): Ch 1, (sc in the sc, ch 3) repeated across to the ch-2 arch, (2 dc, ch 2, 2 dc) in the ch-2 arch space, (ch 3, sc) repeated to the end, turn. (6 ch-3 arches plus the wingtip)
Upper Right Wing Row 5 (RS): Ch 4 (counts as tr), tr in the same sc, ch 3, sc in the next ch-3 space, (ch 3, sc in the next space) 3 times, ch 3, (tr, ch 3, tr, ch 3, tr) in the ch-2 space, ch 3, sc in the next space, ch 3, sc in the next space, ch 3, 2 tr in the end sc, turn. This is the widest wing row.
Upper Right Wing Row 6 (WS): Ch 1, sc between the 2 tr, ch 3, sc in the next space, ch 3, sc in the next space, ch 3, sk 1 tr, (sc, picot, sc) in the next tr, ch 3, sk 1 tr, sc in the next space, ch 3, sc in the next space, ch 3, sc in the next space, ch 3, sc between the 2 tr, turn. (7 ch-3 arches plus 1 picot at the tip)
Upper Right Wing Row 7 (RS): Ch 1, sc in the sc, (ch 3, sc in the next space) twice, ch 3, sc in the next space, ch 3, sc before the picot, (sc, picot, sc) in the picot space, sc after the picot, (ch 3, sc) repeated 4 times, sc in the last sc. Fasten off.
Upper Left Wing: Work Rows 1 to 7 as a mirror image of the upper right wing, beginning at the sc between loop 12 and loop 11 and working into loops 12 and 11, with all left and right references reversed. Fasten off.
Lower Wings
Lower Right Wing Row 1 (RS): Attach the yarn to the sc between loops 6 and 7. Ch 3 (counts as dc), (dc, ch 2, 2 dc) in the same sc junction, ch 3, sc in loop 7, ch 3, sc in loop 8, ch 3, turn.
Lower Right Wing Row 2 (WS): Ch 1, sc in the first sc, ch 3, sc in the next sc, ch 3, (2 dc, ch 2, 2 dc) in the ch-2 space, ch 1, turn.
Lower Right Wing Row 3 (RS): Sc in the sc, ch 3, (sc, ch 3, sc) in the ch-2 space, ch 3, sc in the next sc, ch 3, sc in the last sc, turn. (4 ch-3 arches)
Lower Right Wing Row 4 (WS): Ch 1, sc in the sc, ch 3, sc in the next space, ch 3, (2 dc, ch 2, 2 dc) in the ch-2 space, ch 3, sc in the next space, ch 3, sc in the last sc, turn.
Lower Right Wing Row 5 (RS): Ch 3 (counts as dc), dc in the same sc, ch 3, sc in the space, ch 3, (sc, picot, sc) in the ch-2 space, ch 3, sc in the space, ch 3, 2 dc in the last sc. Fasten off.
Lower Left Wing: Work as a mirror image of the lower right wing, using loops 9 and 10. Fasten off.
Antennae: Attach the yarn at the top of the centre between the two upper wings, at the junction sc. Ch 18, sl st back down the chain to form the first antenna, ch 18, sl st back down to form the second antenna. Fasten off, curl the tips slightly and tack them with a small knot.
Waist Row 1: With RS facing, attach the yarn at loop 3 at the bottom. Ch 1, work 3 sc in each of loops 3, 4, 5, 6, 9, 10, 11 and 12, and sc evenly across any junction sc between loops, aiming for a total of 72 (66, 72, 78) sc across the waist edge, turn. (72 sc for 3 to 6 months)
Waist Row 2: Ch 1, sc in each sc across, turn. (72 sc)
Waist Row 3: Ch 1, sc in each sc across. Do not fasten off.
The butterfly should measure about 7 inches wide at the widest wing span and about 5 inches tall from the antenna tips to the waist edge. Block the butterfly flat now and let it dry before continuing.
Shoulder Straps
Right Strap Row 1: With RS facing, attach the yarn at the inner junction point of the upper right wing, near loop 1. Ch 1, sc in each of the next 4 sts along the wing inner edge, turn. (4 sc)
Right Strap Rows 2 to 14: Ch 1, sc across, turn. (4 sc each row)
The strap should measure about 3 inches long; adjust by adding or removing rows of 4 sc.
Right Strap Row 15 (button loop): Ch 1, sc in the first sc, ch 2, sk 2 sc, sc in the last sc, turn.
Right Strap Row 16: Ch 1, sc in the sc, 2 sc in the ch-2 space, sc in the sc. Fasten off. (4 sc)
Left Strap: Work identically on the left wing inner junction, omitting the button loop — the left strap attaches smoothly to the back, and the buttons on the right strap meet the button loops on the back band.
Skirt Pattern
Switch to the 3.75mm hook. The skirt is worked back and forth in rows from the waist edge of the butterfly, keeping the centre back open for the button closure. Pick up along the waist edge with RS facing, joining the yarn at the right back edge of the waist. Counts below are for the 3 to 6 month size.
Foundation Row: Ch 1, sc across all 72 (66, 72, 78) waist stitches. (72 sc)
Row 1 (increase row): Ch 1, (sc in the next 3 sc, 2 sc in the next sc) repeated across, ending with sc in the remaining sc — 18 increases spaced evenly. (90 sc)
Row 2: Ch 1, sc in BLO of each sc across. (90 sc)
Row 3: Ch 3 (counts as dc), dc in each stitch across. (90 dc)
Row 4: Ch 3 (counts as dc), dc in each dc across. (90 dc)
Row 5 (texture ridge): Ch 1, sc in BLO of each dc across. (90 sc)
Row 6: Ch 1, sc in each sc across. (90 sc)
Row 7 (increase row): Ch 1, (sc in the next 4 sc, 2 sc in the next sc) repeated across, ending with any remaining sc — 18 increases. (108 sc)
Row 8: Ch 1, sc in BLO of each sc across. (108 sc)
Row 9: Ch 3, dc in each stitch across. (108 dc)
Row 10: Ch 3, dc in each dc across. (108 dc)
Row 11 (texture ridge): Ch 1, sc in BLO of each dc across. (108 sc)
Row 12: Ch 1, sc in each sc across. (108 sc)
After Tier 1 the skirt should measure about 3 inches deep from the waist and about 22 inches wide laid flat.
Row 13 (increase row): Ch 1, (sc in the next 5 sc, 2 sc in the next sc) repeated across — 18 increases. (126 sc)
Row 14: Ch 1, sc in BLO of each sc across. (126 sc)
Row 15: Ch 3, dc in each stitch across. (126 dc)
Row 16: Ch 3, dc in each dc across. (126 dc)
Row 17 (texture ridge): Ch 1, sc in BLO of each dc across. (126 sc)
Row 18: Ch 1, sc in each sc across. (126 sc)
Row 19 (increase row): Ch 1, (sc in the next 5 sc, 2 sc in the next sc) repeated across — 21 increases. (147 sc)
Row 20: Ch 1, sc in BLO of each sc across. (147 sc)
Row 21: Ch 3, dc in each stitch across. (147 dc)
Row 22: Ch 3, dc in each dc across. (147 dc)
Row 23 (texture ridge): Ch 1, sc in BLO of each dc across. (147 sc)
Row 24: Ch 1, sc in each sc across. (147 sc)
After Tier 2 the skirt should measure about 6 inches deep and about 29 inches wide laid flat.
Row 25 (increase row): Ch 1, (sc in the next 6 sc, 2 sc in the next sc) repeated across — 21 increases. (168 sc)
Row 26: Ch 1, sc in BLO of each sc across. (168 sc)
Row 27: Ch 3, dc in each stitch across. (168 dc)
Row 28: Ch 3, dc in each dc across. (168 dc)
Row 29 (texture ridge): Ch 1, sc in BLO of each dc across. (168 sc)
Row 30: Ch 1, sc in each sc across. (168 sc)
Row 31 (increase row): Ch 1, (sc in the next 6 sc, 2 sc in the next sc) repeated across — 24 increases. (192 sc)
Row 32: Ch 1, sc in BLO of each sc across. (192 sc)
Row 33: Ch 3, dc in each stitch across. (192 dc)
Row 34: Ch 3, dc in each dc across. (192 dc)
Row 35 (texture ridge): Ch 1, sc in BLO of each dc across. (192 sc)
Row 36: Ch 1, sc in each sc across. (192 sc)
The skirt should now measure about 9.5 inches deep and about 38 inches wide laid flat.
Row 37 (shell setup row): Ch 1, (sc in the first sc, ch 2, sk 2 sc, shell in the next sc, ch 2, sk 2 sc) repeated across, ending with sc in the last sc. (32 shells plus 33 sc)
Row 38 (scallop picot row): Ch 1, sc in the first sc, ch 2, (sc in the first dc of the shell, dc in the next dc, (dc, ch 2, dc) in the centre dc of the shell, dc in the next dc, sc in the last dc of the shell, ch 2, sc between shells) repeated across, ending with ch 2, sc in the final sc. Fasten off.
Total dress length from the butterfly waist to the scallop tips should be about 12.5 inches for the 3 to 6 month size.
Back Bands & Buttons
Right Back Band Row 1: With RS facing, attach the yarn at the top right back corner of the skirt opening. Ch 1, sc evenly down the right back edge, about 1 sc per sc row and 1 sc per dc row, for approximately 48 sc in total, turn. (48 sc)
Right Back Band Row 2: Ch 1, sc in each sc across. Fasten off.
Left Back Band Row 1: With RS facing, attach the yarn at the bottom left back corner. Ch 1, sc evenly up the left back edge to match, approximately 48 sc, turn. (48 sc)
Left Back Band Row 2 (button loops): Ch 1, sc in the first 3 sc, (ch 3, sk 2 sc, sc in the next 5 sc) repeated 7 times, ch 3, sk 2 sc, sc in the last sc, turn. (8 ch-3 button loops)
Left Back Band Row 3: Ch 1, sc in each sc and 3 sc in each ch-3 space across. Fasten off. (approximately 72 sc)
Sew 8 pearl buttons to the right back band at the positions that meet the button loops, spaced evenly from 1 inch below the top to 1 inch above the hem. If you like, sew 2 to 4 extra pearl buttons decoratively down the centre front of the butterfly body.
Small Applique Butterflies (Make 2)
Work each small butterfly exactly like the large bodice butterfly — medallion Rounds 1 to 5, then the upper and lower wings worked through Row 3 only, stopping before the wingtip spread rows — for a compact butterfly about 2 inches wide.
With white yarn and your tapestry needle, embroider simple radiating lines on the wings to suggest wing veining, matching the large butterfly.
Sew one small butterfly to the lower right skirt, about 3 inches up from the hem and 3 inches from the centre front. Sew the second one 1.5 inches below and 0.75 inch to the right of the first, like a little flight cascade.
Booties Pattern (Make 2)
Work with the 3.75mm hook in the main colour.
Sole: Work 10 FSC. (10 sc)
Round 1: Work in the round around the FSC strip: 3 sc in the first FSC (toe), sc in the next 8 FSC, 3 sc in the last FSC (heel), sc in the next 8 FSC along the opposite side of the foundation, sl st to join. (22 sc)
Round 2: Ch 1, 2 sc in each of the first 3 sc (toe increases), sc in the next 8 sc, 2 sc in each of the next 3 sc (heel increases), sc in the next 8 sc, sl st to join. (28 sc)
Round 3: Ch 1, sc in each sc around, sl st to join. (28 sc)
Round 4: Ch 3 (counts as dc), dc in each sc around, sl st to the top of the ch-3 to join. (28 dc)
Round 5: Ch 1, sc in each dc around, sl st to join. (28 sc)
Round 6: Ch 1, sc in the first 10 sc, sc2tog 4 times across the centre toe 8 sts, sc in the last 10 sc, sl st to join. (24 sc)
Round 7: Ch 1, sc in the first 10 sc, sc2tog twice across the centre 4 sts, sc in the last 10 sc, sl st to join. (22 sc)
Round 8: Ch 3, dc in each sc around, sl st to join. (22 dc)
Round 9: Ch 1, sc in each dc around, sl st to join. (22 sc)
Round 10: Ch 3, (dc, ch 1, sk 1 sc, dc in the next sc) repeated around, sl st to join. (11 dc and ch-1 groups, 22 dc in total)
Round 11 (scallop cuff): Ch 1, (sc in the dc, sc in the ch-1 space, sc in the dc, shell in the next dc) repeated around, sl st to join, making 5 to 6 small scallops around the ankle. Fasten off.
Finishing & Assembly
Weave the ribbon through the chain-1 spaces of Round 10 of each bootie, beginning and ending at the centre front, and tie it in a bow.
Weave in all remaining ends, give the dress a final gentle block, and check that the back buttons sit neatly opposite their loops and the straps button smoothly at the back.
Tips
Swatch carefully for this one — the butterfly bodice size decides how the whole dress fits, so even a small gauge difference shows.
Block the butterfly flat before you start the skirt. It makes the waist row so much easier to work evenly.
Choose a smooth, tightly plied yarn with at least 60 percent cotton so the wing lace reads clearly and the skirt drapes the way it should. Fuzzy yarns will hide all that pretty detail.
Sunshine Yellow Butterfly Baby Dress Free Crochet Pattern
Materials
Steps
- Work the butterfly centre medallion in 6 rounds
- Shape the upper and lower wings and add the antennae
- Work the waist rows and the 2 shoulder straps
- Work the tiered skirt in 38 rows to the scallop hem
- Add the back button bands and sew on 8 pearl buttons
- Make 2 small applique butterflies and sew them to the skirt
- Work 2 booties in rounds and thread the ribbons
- Block the butterfly flat before starting the skirt
- Swatch carefully, the bodice size decides the fit of the whole dress
- Choose smooth cotton yarn so the wing lace reads clearly


