Lavender Dream Crochet Bell Sleeve Top Free Pattern
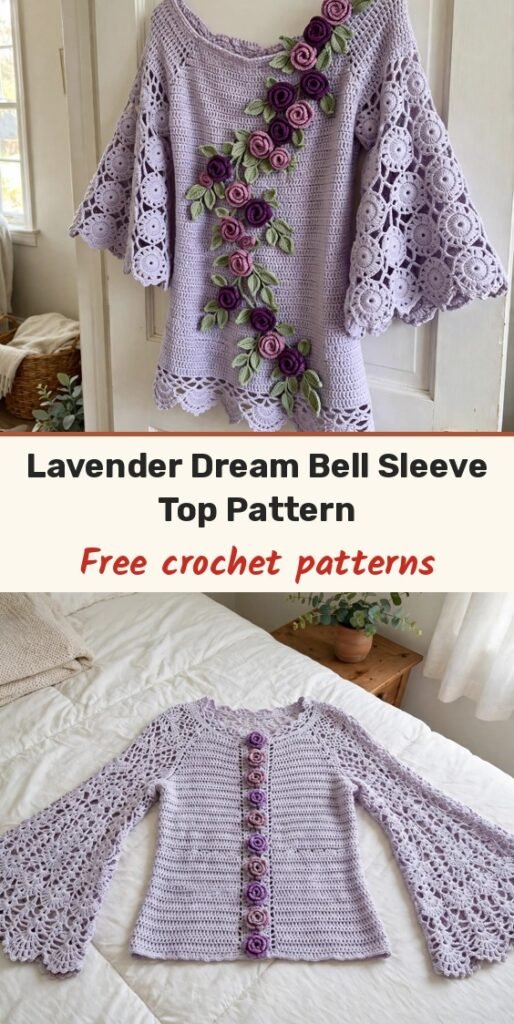
Table of Contents
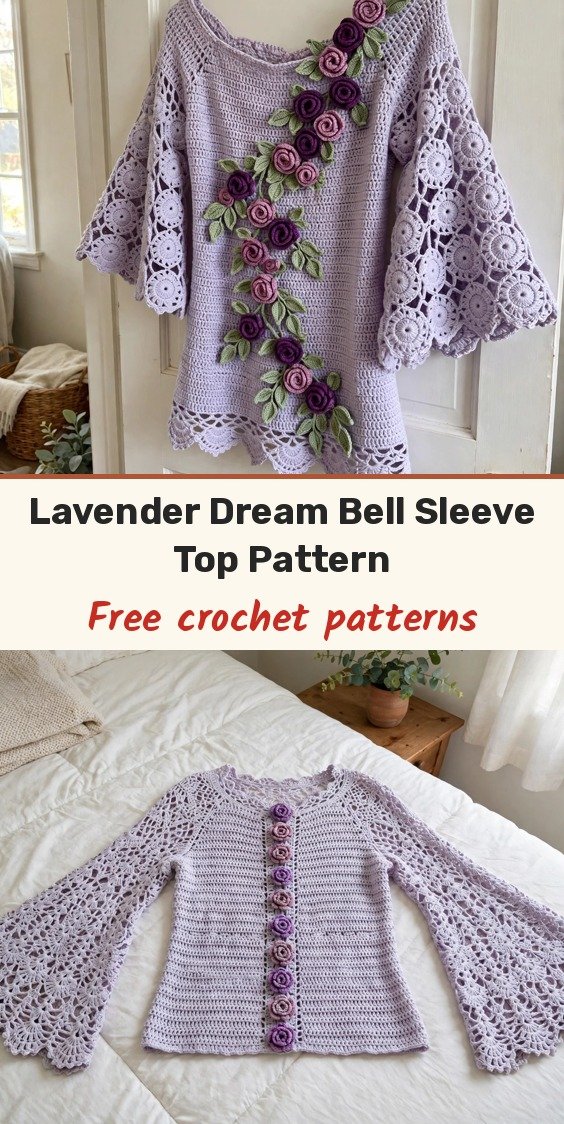
This lavender top feels like stepping into a romantic garden party, and I love every part of it! We start with a ribbed neckband for that pretty off-shoulder look, work a fitted single crochet bodice in the round with gentle bust, waist, and hip shaping, and finish with a scalloped hem.
The sleeves are the showstopper: we crochet 16 little lace motifs, join 8 into each sleeve tube, add a shaped sleeve cap, and sew them into the armholes. Then come the straps and a cascade of rolled roses and leaves down the front.
It is an intermediate pattern, written for size Small with a 32 to 34 inch bust, a 14 inch length from underarm, and 18 inch bell sleeves. If you can work basic stitches in rows and rounds, you can absolutely make this with me.
Materials
- 800 to 1,000 yards of light worsted or DK weight yarn (category 3) in light lavender or periwinkle (Main Colour)
- 50 yards of DK weight yarn in deep purple (Contrast Colour 1)
- 50 yards of DK weight yarn in medium mauve or dusty rose (Contrast Colour 2)
- 40 yards of DK weight yarn in pale sage green (Contrast Colour 3)
- 4.0 mm crochet hook (US G/6) for bodice and sleeves
- 3.5 mm crochet hook (US E/4) for ribbing and appliques
- Tapestry needle
- At least 8 stitch markers
- Scissors and measuring tape
Abbreviations
- ch: chain
- sl st: slip stitch
- sc: single crochet
- hdc: half double crochet
- dc: double crochet
- tr: treble crochet
- sc2tog: single crochet two together (decrease)
- BLO: back loop only
- FLO: front loop only
- sk: skip
- st(s): stitch(es)
- rnd(s): round(s)
- sp: space
Gauge & Size
- Gauge: 18 stitches and 20 rows = 4 inches in single crochet with a 4.0 mm hook
- Finished size: size Small, bust 32 to 34 inches, length from underarm 14 inches, sleeve length from underarm 18 inches, bell sleeve circumference at cuff 20 inches
- Construction: ribbed neckband joined into a tube, bodice worked down in the round with an armhole divide, motif sleeves sewn in, straps, and sewn-on rose and leaf appliques
- Skill level: Intermediate
Neckband Pattern
The neckband creates that stretchy off-shoulder look. We work it flat in rows, then join it.
Foundation: Using a 3.5 mm hook and Main Colour, ch 11.
Row 1: Sc in 2nd ch from hook and in each ch across. (10 sts)
Row 2: Ch 1, turn. Sc BLO in each st across. (10 sts)
Rows 3-120: Repeat Row 2.
This creates approximately 26 to 28 inches of ribbing. Adjust rows to fit your upper chest measurement plus 2 inches of ease. Fold the ribbing so the short ends meet and sl st through both layers to join into a tube. Do not fasten off.
Bodice Pattern
Now we pick up stitches along the bottom edge of the ribbing and work down.
Setup Round: Using a 4.0 mm hook, ch 1. Work 120 sc evenly spaced around the bottom edge of the neckband, placing stitches in the row ends. Sl st to first sc to join. Place marker. (120 sts)
Rounds 1-4: Ch 1, sc in each st around. Sl st to join. (120 sts)
Round 5 (Increase for bust): Ch 1, (sc in next 14 sts, 2 sc in next st) repeat around. Sl st to join. (128 sts)
Rounds 6-10: Ch 1, sc in each st around. Sl st to join. (128 sts)
Round 11 (Increase): Ch 1, (sc in next 15 sts, 2 sc in next st) repeat around. Sl st to join. (136 sts)
Rounds 12-30: Ch 1, sc in each st around. Sl st to join. (136 sts)
Round 31 (Armhole Division): Ch 1, sc in next 34 sts. Ch 8 (this creates the underarm). Skip next 34 sts. Sc in next 34 sts. Ch 8. Skip remaining 34 sts. Sl st to join.
Round 32: Ch 1, sc in each st and each ch around. Sl st to join. (84 sts: 34 front + 8 ch + 34 back + 8 ch)
Rounds 33-56: Ch 1, sc in each st around. Sl st to join. (84 sts)
Round 57 (Decrease): Ch 1, (sc in next 12 sts, sc2tog) repeat around. Sl st to join. (78 sts)
Rounds 58-62: Ch 1, sc in each st around. (78 sts)
Round 63 (Decrease): Ch 1, (sc in next 11 sts, sc2tog) repeat around. Sl st to join. (72 sts)
Rounds 64-70: Ch 1, sc in each st around. (72 sts)
Round 71 (Increase): Ch 1, (sc in next 11 sts, 2 sc in next st) repeat around. (78 sts)
Rounds 72-80: Ch 1, sc in each st around. (78 sts)
Round 81 (Scallop Edging): (Sk 1 st, 5 dc in next st (shell made), sk 1 st, sl st in next st) repeat around. Fasten off.
Bell Sleeve Pattern
Make 2 sleeves. Each sleeve is built from 8 lace motifs joined into a tube, so make 16 motifs in total. Use a 4.0 mm hook and Main Colour.
Motif Foundation: Ch 6. Sl st to first ch to form a ring.
Motif Round 1: Ch 3 (counts as dc), 15 dc in ring. Sl st to top of ch-3. (16 dc)
Motif Round 2: Ch 5 (counts as dc + ch 2), (dc in next st, ch 2) repeat around. Sl st to 3rd ch of ch-5. (16 dc, 16 ch-2 sps)
Motif Round 3: Sl st into ch-2 sp. Ch 3, 2 dc in same sp, ch 2, (3 dc in next ch-2 sp, ch 2) repeat around. Sl st to top of ch-3. (16 groups of 3 dc)
Motif Round 4: Ch 1, sc in each dc and 2 sc in each ch-2 sp around. Sl st to join. (64 sts)
Fasten off, leaving a 12-inch tail for sewing. Arrange 8 motifs in two rows of 4 and sew them together using whip stitch, matching stitch for stitch. Form a tube by sewing the side edges together.
Sleeve Cap Round 1: Join Main Colour at the top edge of the motif tube. Ch 1, sc evenly around the top opening, working approximately 60 sc. Sl st to join.
Sleeve Cap Rounds 2-10: Ch 1, sc in each st around, decreasing 4 sts evenly each round until the opening measures approximately 10 to 11 inches around (approximately 24 sts after all decreases).
Attaching: Place the sleeve into the armhole opening and whip stitch the sleeve cap to the armhole edge, easing to fit. Repeat for the second sleeve.
Cuff Edging: Join Main Colour at the bottom of the sleeve and work the scallop edging the same as the bodice hem: (sk 1 st, 5 dc in next st, sk 1 st, sl st in next st) repeat around. Fasten off.
Shoulder Straps
Make 2 straps. Using a 3.5 mm hook and Main Colour, ch 80 (or your desired length to reach from neckband front to neckband back).
Row 1: Sc in 2nd ch from hook and each ch across. Fasten off.
Sew the straps to the inside of the neckband, placing them approximately 3 inches from centre front and centre back.
Rose and Leaf Appliques
Large Rose: Make 3 in Contrast Colour 1 and 2 in Contrast Colour 2. Using a 3.5 mm hook, ch 40.
Large Rose Row 1: Dc in 4th ch from hook. (Sk 1 ch, 3 dc in next ch) repeat across. (Approximately 19 shells)
Fasten off, leaving an 18-inch tail. Roll the strip from the starting end, coiling tightly at first, then loosening slightly. Secure with the tail, stitching through all layers at the base.
Small Rose: Make 2 in Contrast Colour 2 and 1 in Contrast Colour 1. Using a 3.5 mm hook, ch 28.
Small Rose Row 1: Dc in 4th ch from hook. (Sk 1 ch, 3 dc in next ch) repeat across.
Roll and secure the same as the large rose.
Leaf: Make 8 in Contrast Colour 3. Ch 10.
Leaf Row 1: Sc in 2nd ch from hook, hdc in next ch, dc in next 3 ch, hdc in next ch, sc in next ch, sl st in next ch. Working along the opposite side of the chain: sl st in next ch, sc in next ch, hdc in next ch, dc in next 3 ch, hdc in next ch, sc in last ch. Sl st to first sc. Fasten off.
Finishing & Assembly
The roses cascade diagonally from the right shoulder area down across the front to the left hip. Lay the top flat and arrange everything before sewing: start with two larger roses near the right shoulder, add the remaining roses in between, and finish with smaller roses and leaves near the left hip, tucking leaves behind and around the roses.
Using matching yarn colours, sew each rose through the base only. Secure the leaves along their centre line, letting the edges curl naturally.
Weave in all remaining ends. Block the bodice lightly if needed, being careful not to flatten the roses.
Tips
Count your stitches, especially on the bodice. Place markers every 20 stitches to catch errors early.
Make the roses first if you like quick wins. They are fast, pretty, and build confidence before tackling the garment.
A smooth mercerized cotton gives the best drape and shows the lace pattern beautifully. Acrylic will work, but it may not drape as elegantly.
The sleeve cap pickup and final stitch count are given as approximations in the pattern, so ease the cap gently as you sew it into the armhole and check the fit before finishing the seam.
Lavender Dream Crochet Bell Sleeve Top Free Pattern
Materials
Steps
- Crochet the ribbed neckband in 120 rows and join into a tube
- Pick up 120 stitches and work the bodice with bust shaping
- Divide for armholes and shape the waist and hip
- Finish the bodice with scallop edging
- Make 16 lace motifs and join 8 into each sleeve tube
- Shape the sleeve caps and sew sleeves into the armholes
- Add shoulder straps
- Make and sew on roses and leaves
- Place markers every 20 stitches on the bodice
- Make the roses first for quick wins
- Ease the sleeve cap gently when sewing it into the armhole