Monarch Butterfly Shawl Free Crochet Pattern
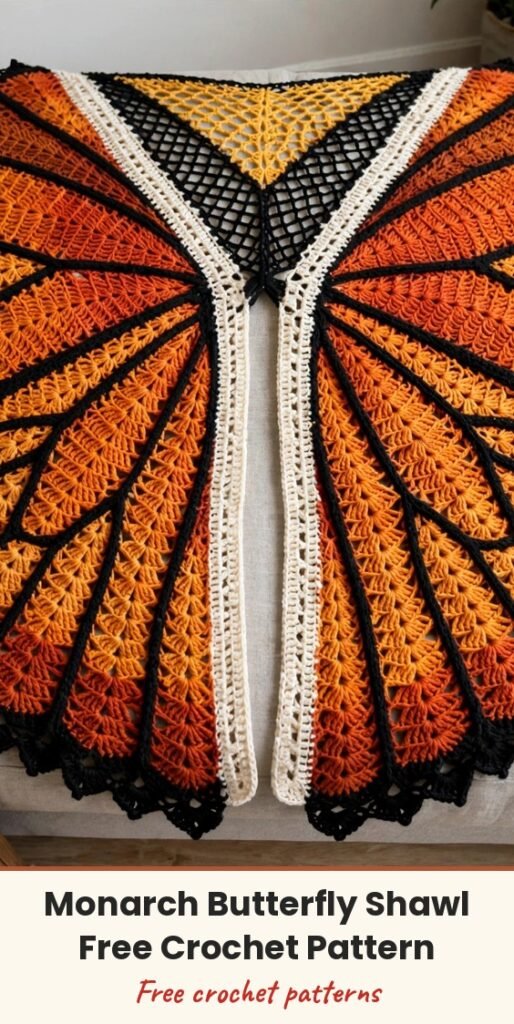
Table of Contents
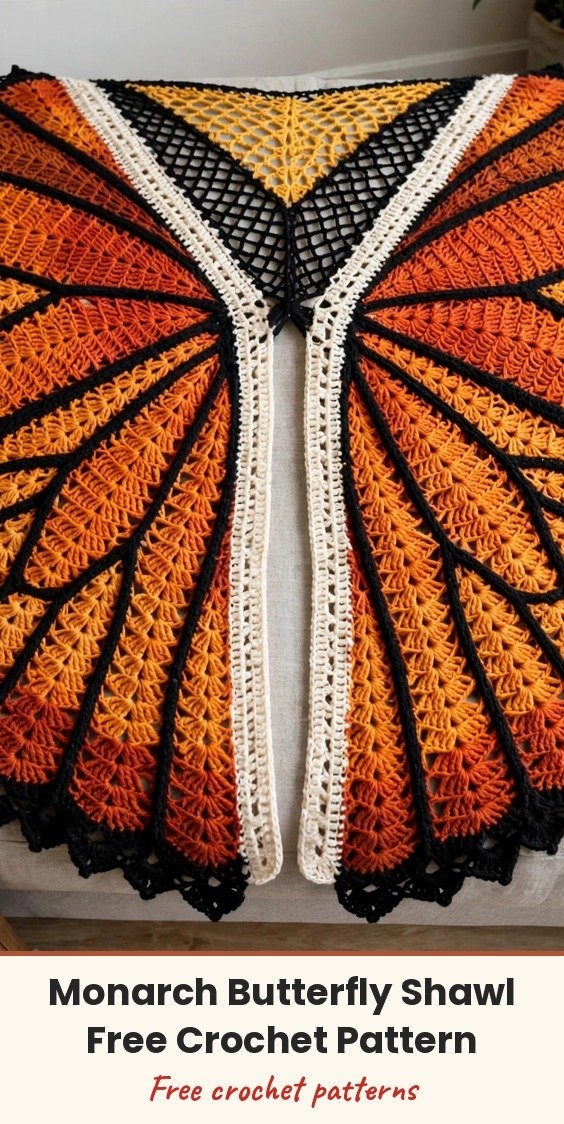
This shawl is a true showpiece, and I am so excited to make it with you! We crochet a black mesh yoke first, then work two big tapestry single crochet wing panels down from it in deep orange, amber, and black, shaping them from a neat 55 stitches all the way out and back down to a pointed tip.
It is worn cardigan-style, with open wing sections for your arms, and when you spread your arms wide those monarch wings unfurl behind you. The cream slip stitch stripe down each front edge is the butterfly’s body, and we finish with black scallop borders, little white dot stitches, and surface crochet veins.
This is an advanced intermediate project with lots of colourwork, so budget plenty of happy making time, use bobbins for your colours, and mark every checkpoint with me. The wingspan depends on hitting gauge, so please swatch with your colourwork method first.
Materials
- 500 yards of worsted weight yarn (category 4) in deep burnt orange (Colour A)
- 400 yards of worsted weight yarn (category 4) in bright amber orange (Colour B)
- 350 yards of worsted weight yarn (category 4) in black (Colour C)
- 150 yards of worsted weight yarn (category 4) in cream or off-white (Colour D)
- 80 yards of worsted weight yarn (category 4) in bright white (Colour E)
- 6.0 mm crochet hook (US J-10) for the main fabric
- 4.0 mm crochet hook (US G-6) for surface crochet veins
- Yarn needle, at least 10 stitch markers, and scissors
- Blocking mats, T-pins, and a spray bottle
- Optional tapestry crochet bobbins
Abbreviations
- beg: beginning
- ch: chain
- ch-sp: chain space
- cont: continue
- dc: double crochet
- dec: decrease
- hdc: half double crochet
- inc: increase (work 2 stitches into the same stitch)
- pm: place marker
- rem: remaining
- rep: repeat
- rnd: round
- RS: right side
- sc: single crochet
- sc2tog: single crochet two together
- sk: skip
- sl st: slip stitch
- sm: slip marker
- sp: space
- st(s): stitch(es)
- tch: turning chain
- WS: wrong side
- yo: yarn over
Special Stitches
- Tapestry single crochet: carry the unused colours inside your stitches. Hold the inactive strand along the top of the previous row, insert your hook into the next stitch, lay the inactive strand over the hook, yarn over with the active colour only and pull up a loop, then yarn over with the active colour and draw through both loops. Change colour by working the sc until 2 loops remain on the hook, then completing it with the new colour, one stitch before you want the new colour to appear.
- Mesh stitch: chain 2, skip stitches, single crochet in the next stitch, as written out in full in the yoke rows below. This creates the open lattice of the yoke.
- Dot stitch: with Colour E (white), work 3 sc tightly into the same stitch to form a raised bobble-like dot. Dots are added individually during finishing.
- Scallop border stitch: slip stitch into the first stitch, ch 3, work 4 dc into the same stitch, skip 2 stitches, slip stitch into the next stitch, skip 2 stitches, and repeat, as written out in the border steps below.
Gauge & Size
- Gauge: 18 sc and 20 rows = 4 inches in tapestry single crochet with two strands carried, using a 6.0 mm hook
- Finished size: fits a standard adult size US S through L; the yoke measures approximately 24 inches wide by 4 inches tall, and each completed wing panel measures approximately 30 inches long from neck to lower tip
- Construction: black mesh yoke worked flat, two mirrored tapestry wing panels worked flat down from the yoke, then borders, white dots, and surface crochet veins
- Skill level: Advanced Intermediate
Yoke Pattern
The yoke spans your shoulders and is worked flat in mesh stitch using Colour C (black). Place a stitch marker at the centre sc of the yoke (stitch 19 of 37) when you finish; this marks the centre back of your shawl.
Foundation: With Colour C, ch 111.
Foundation Row (RS): Sc in 2nd ch from hook, (ch 2, skip 2 ch, sc in next ch) repeat across, ending sc in last ch, turn. (37 sc plus 36 ch-2 spaces)
Row 1 (WS): Ch 1, turn. Sc in first sc, (ch 2, skip ch-2 space, sc in next sc) repeat across to last sc, sc in last sc. (37 sc)
Row 2 (RS): Ch 1, turn. Sc in first sc, (ch 2, skip ch-2 space, sc in next sc) repeat across. (37 sc)
Rows 3 through 10: Repeat Row 1 and Row 2 alternately four more times. (37 sc each row)
Do not fasten off yet for measuring: your yoke should measure approximately 4 inches tall and 24 inches wide.
Right Wing Pattern
The right wing is worked from the right side of the yoke outward and downward. Attach Colour A with a sl st to the bottom-right corner sc of the yoke. Throughout the wing, stitches 1 to 15 from the inner edge begin in Colour A, the middle zone alternates Colour A and Colour B as written, and the outermost 8 stitches are Colour C, with the exact colour counts given row by row below.
Beginning Pickup Row (RS): Ch 1. Working along the bottom edge of the yoke, sc evenly across the right half from the right edge to the centre marker, picking up 1 sc per sc anchor point and 2 sc per ch-2 space: 19 sc anchor points plus 18 ch-2 spaces at 2 sc each. (55 sc)
Row 1 (WS): Ch 1, turn. Sc across all 55 sts in Colour A. (55 sc)
Row 2 (RS): Ch 1, turn. Sc in each of first 54 sts, 2 sc in last st (wing outer edge increase). (56 sc)
Row 3 (WS): Ch 1, turn. 2 sc in first st, sc across to end. (57 sc)
Row 4 (RS): Ch 1, turn. Sc across to last st, 2 sc in last st. (58 sc)
Row 5 (WS): Ch 1, turn. 2 sc in first st, sc across to end. (59 sc)
Row 6 (RS): Ch 1, turn. Sc across to last st, 2 sc in last st. (60 sc)
Row 7 (WS): Ch 1, turn. 2 sc in first st, sc across to end. (61 sc)
Row 8 (RS): Ch 1, turn. Sc across to last st, 2 sc in last st. (62 sc)
Row 9 (WS): Ch 1, turn. 2 sc in first st, sc across to end. (63 sc)
Row 10 (RS): Ch 1, turn. Sc across to last st, 2 sc in last st. (64 sc)
Rows 11 through 20: Continue this same increase pattern, increasing 1 stitch on each end of every row (RS increase at the outer edge, WS increase at the inner edge). After Row 20: (74 sc)
Row 21 (WS): 2 sc in first st (inc), 14 sc Colour A, 35 sc Colour B, 8 sc Colour C, sc2tog at outer edge (dec). (75 sc)
Row 22 (RS): Ch 1, turn. Sc2tog at outer edge, 6 sc Colour C, 1 sc Colour A, 30 sc Colour B, 15 sc Colour A, 2 sc in last st at inner edge. (75 sc)
Rows 23 through 40: Continue with the same structure, increasing 1 at the inner edge and decreasing 1 at the outer edge, maintaining 75 sc total while the colour zones shift as follows (inner edge to outer edge): Rows 23-24: 16 sc A, 51 sc B, 8 sc C. (75 sc)
Rows 25-26: 17 sc A, 50 sc B, 8 sc C. (75 sc)
Rows 27-28: 18 sc A, 49 sc B, 8 sc C. (75 sc)
Rows 29-30: 19 sc A, 48 sc B, 8 sc C. (75 sc)
Rows 31-32: 20 sc A, 47 sc B, 8 sc C. (75 sc)
Rows 33-34: 21 sc A, 46 sc B, 8 sc C. (75 sc)
Rows 35-36: 22 sc A, 45 sc B, 8 sc C. (75 sc)
Rows 37-38: 23 sc A, 44 sc B, 8 sc C. (75 sc)
Rows 39-40: 24 sc A, 43 sc B, 8 sc C. (75 sc)
Lower Wing Expansion
Now the lower wing widens. Increase 1 at BOTH edges every RS row while maintaining the black outer border at 8 stitches.
Row 41 (RS): 2 sc in first st, 24 sc A, 41 sc B, 8 sc C, 2 sc in last st. (77 sc)
Row 42 (WS): Sc across maintaining colour zones. (77 sc)
Row 43 (RS): 2 sc in first st, 24 sc A, 43 sc B, 8 sc C, 2 sc in last st. (79 sc)
Row 44 (WS): Sc across. (79 sc)
Row 45 (RS): 2 sc in first st, 25 sc A, 44 sc B, 8 sc C, 2 sc in last st. (81 sc)
Row 46 (WS): Sc across. (81 sc)
Row 47 (RS): 2 sc in first st, 25 sc A, 46 sc B, 8 sc C, 2 sc in last st. (83 sc)
Row 48 (WS): Sc across. (83 sc)
Row 49 (RS): 2 sc in first st, 26 sc A, 47 sc B, 8 sc C, 2 sc in last st. (85 sc)
Row 50 (WS): Sc across. (85 sc)
Row 51 (RS): 2 sc in first st, 26 sc A, 49 sc B, 8 sc C, 2 sc in last st. (87 sc)
Row 52 (WS): Sc across. (87 sc)
Row 53 (RS): 2 sc in first st, 27 sc A, 50 sc B, 8 sc C, 2 sc in last st. (89 sc)
Row 54 (WS): Sc across. (89 sc)
Row 55 (RS): 2 sc in first st, 27 sc A, 52 sc B, 8 sc C, 2 sc in last st. (91 sc)
Row 56 (WS): Sc across. (91 sc)
Row 57 (RS): 2 sc in first st, 28 sc A, 53 sc B, 8 sc C, 2 sc in last st. (93 sc)
Row 58 (WS): Sc across. (93 sc)
Row 59 (RS): 2 sc in first st, 28 sc A, 55 sc B, 8 sc C, 2 sc in last st. (95 sc)
Row 60 (WS): Sc across. (95 sc)
Even Rows and Tip Shaping
Work even with no increases or decreases while continuing the colourwork.
Rows 61-63: 28 sc A, 59 sc B, 8 sc C. (95 sc each row)
Rows 64-66: 29 sc A, 58 sc B, 8 sc C. (95 sc each row)
Rows 67-69: 30 sc A, 57 sc B, 8 sc C. (95 sc each row)
Rows 70-72: 31 sc A, 56 sc B, 8 sc C. (95 sc each row)
Rows 73-75: 32 sc A, 55 sc B, 8 sc C. (95 sc each row)
Row 76 (RS): Sc2tog, sc2tog, sc across to last 2 sts, sc2tog. (92 sc)
Row 77 (WS): Sc across. (92 sc)
Row 78 (RS): Sc2tog, sc2tog, sc across to last 2 sts, sc2tog. (89 sc)
Row 79 (WS): Sc across. (89 sc)
Rows 80 through 91: Continue this pattern, decreasing by 3 stitches every RS row (sc2tog twice at the outer edge and sc2tog once at the inner edge on RS rows, sc across on WS rows), giving 86 sc after Row 80, 83 sc after Row 82, 80 sc after Row 84, 77 sc after Row 86, 74 sc after Row 88, and 71 sc after Row 90, with WS rows matching.
Row 92 (RS): Sc2tog three times at outer edge, sc across to last 2 sts, sc2tog. (67 sc)
Row 93 (WS): Sc across. (67 sc)
Row 94 (RS): Sc2tog three times at outer edge, sc across to last 2 sts, sc2tog. (63 sc)
Row 95 (WS): Sc across. (63 sc)
Row 96 (RS): Sc2tog three times at outer edge, sc across to last 2 sts, sc2tog. (59 sc)
Row 97 (WS): Sc across. (59 sc)
Row 98 (RS): Sc2tog three times at outer edge, sc across to last 2 sts, sc2tog. (55 sc)
Row 99 (WS): Sc across. (55 sc)
Row 100 (RS): Sc2tog twice at outer edge, sc across to last 2 sts, sc2tog. (52 sc)
Fasten off. Your completed right wing panel is approximately 30 inches long from neck to lower tip.
Left Wing Pattern
Return to the yoke. Attach Colour A with a sl st to the bottom-left corner sc.
Pickup Row (RS): Ch 1. Sc evenly across the left half of the yoke bottom edge from the centre marker to the left edge. (55 sc)
Work Rows 1 through 100 exactly as written for the right wing, but mirror the shaping: all increases and decreases that occurred at the outer edge now occur at the LEFT outer edge. For the tapestry colourwork rows, read the colour zones in reverse order, so the outer black border is on the left side and the inner orange zone is on the right. Fasten off after Row 100. (52 sc)
Finishing & Assembly
Front opening body stripe: With Colour D (cream), join at the top right front corner of the right wing inner edge. Work sl st evenly down the entire inner front edge, spacing 1 sl st per row end (approximately 100 sl sts). Fasten off and repeat on the left wing inner edge. These cream columns are the butterfly’s body stripe.
Lower wing edge border: With Colour C (black), join with a sl st at the inner lower right corner of the right wing. Border Row 1: sc evenly across the entire lower edge from inner corner to outer wing tip (approximately 80 sc). Border Row 2: ch 1, turn, sc in each st across (80 sc). Border Row 3 (scallop row): do not turn; work (sl st in first st, ch 3, 4 dc in same st, skip 2 sts, sl st in next st, skip 2 sts) repeat across (16 scallop repeats). Fasten off and repeat the border on the left wing.
Outer wrist edge finish: With Colour C, join at the top outer corner of the right wing. Sc evenly down the outer angled edge, work the sc border for 2 rows total, then work 1 row of scallop border. Fasten off and repeat on the left wing.
Neck edge finish: With Colour C, join at the right front top corner and sl st across the entire top neck edge of the yoke (approximately 111 sl sts). Fasten off.
White dot embellishment: Using Colour E (white) and a yarn needle, work dot stitches at regular intervals across the black scallop border, spacing dots approximately every 4th stitch and placing them within the black border zone only. Aim for 20 to 24 dots across each lower wing border and 6 to 8 dots along each outer wrist edge. Fasten off each dot individually and weave in ends on the wrong side.
Surface crochet veins: Wing veins are added after blocking. Using Colour C and the smaller 4.0 mm hook, hold the yarn behind the fabric and work surface slip stitches in curved lines radiating from the body centre outward toward the wing edges, branching gently toward the outer edges as monarch wing veins do.
Weave in all remaining ends securely. Block the shawl flat on blocking mats, spraying with water and pinning the scalloped edges into crisp points, and allow it to dry completely before wearing. Hand wash or soak according to your yarn label, and support the shawl fully when lifting it wet.
Tips
Take your time with the colourwork. If this is your first tapestry project, work a small practice swatch until you are comfortable carrying the inactive yarn inside your stitches.
Use bobbins for the multiple colours. They prevent tangling and keep your workspace calm on the long colourwork rows.
Mark your checkpoints as you go: 74 sc after Row 20, 75 sc held through the colourwork shift rows, 95 sc at the widest point, and 52 sc at the tip.
Block generously. This shawl really comes to life after wet blocking, when the scalloped border and wing shape open up into that dramatic silhouette.
Monarch Butterfly Shawl Free Crochet Pattern
Materials
Steps
- Crochet the black mesh yoke in 10 rows
- Pick up 55 stitches and shape the right wing to Row 20
- Work the tapestry colourwork rows to Row 60
- Work even rows and tip shaping to Row 100
- Mirror the left wing from the yoke
- Add front stripes, scallop borders, and neck finish
- Add white dot stitches and surface crochet veins
- Block the finished shawl
- Swatch in tapestry crochet with colours carried before starting
- Use bobbins to manage the multiple colours
- Check counts at Rows 20, 60, 75, and 100
- Block and pin every scallop point open