Mint Green Starfish Baby Cocoon Free Crochet Pattern
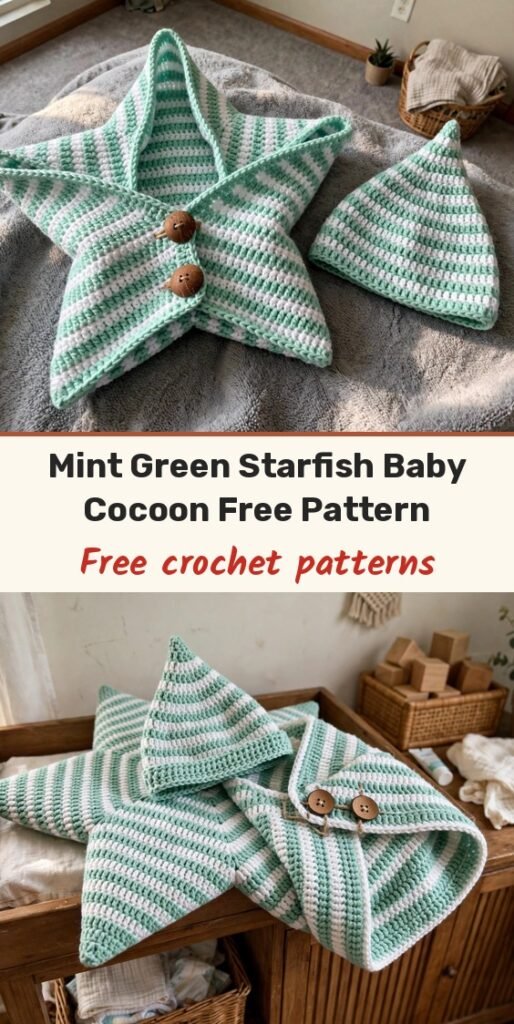
Table of Contents
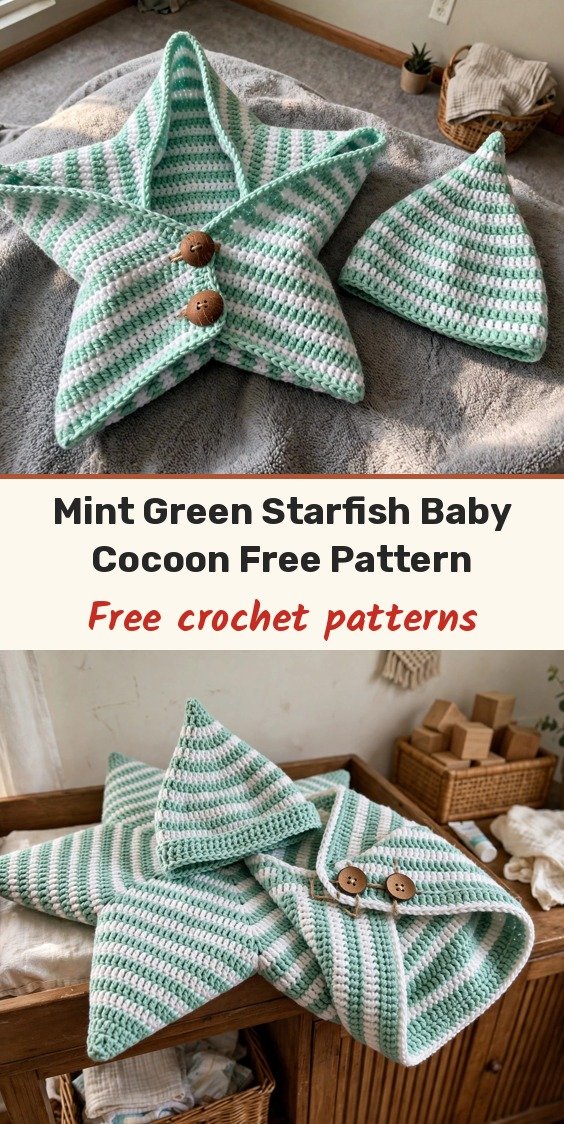
There is something about watching a baby nestle into a star shape that makes every hour of work completely worth it! This mint green starfish cocoon wraps snugly around a newborn with five points forming a perfect star silhouette when laid flat, and the matching pixie hat has that tall pointed top that echoes the star body.
We build it in a really manageable way: a main body panel first, then five separate star points that we attach, a button band with two coconut shell buttons for easy dressing, and the sweet striped hat. The whole set works up in mint green and white stripes that photograph beautifully for newborn pictures and baby shower gifts.
Only single crochet is used, so the stitches themselves are beginner friendly. I rate it intermediate because we manage two colours at once, follow shaping sequences, and assemble the three-dimensional cocoon from flat pieces. Total time is about 11 to 16 hours.
Materials
- Worsted weight cotton or cotton-blend yarn, Color A Mint green: approximately 350 yards
- Worsted weight cotton or cotton-blend yarn, Color B White or cream: approximately 300 yards
- US G-6 (4.0 mm) crochet hook
- 2 coconut shell buttons, approximately 1 inch diameter
- Yarn needle for weaving ends
- Scissors
- Stitch markers (at least 5)
- Straight pins for blocking
Abbreviations
- ch: chain
- sc: single crochet
- sc2tog: single crochet two together
- inc: increase, 2 sc in the same stitch
- sl st: slip stitch
- st/sts: stitch / stitches
- RS: right side
- WS: wrong side
- sk: skip
- sp: space
- rem: remaining
Special Stitches
- Two-colour stripe carry: work in alternating 2-row stripes (2 rows Color A, 2 rows Color B). When switching colours at the end of a row, draw the new colour through the last two loops of the final stitch, and carry the unused yarn loosely up the side of the work instead of cutting it. This avoids long floats and keeps the wrong side tidy.
Gauge & Size
- Finished size: cocoon approximately 18 inches wide point to point and 13 inches tall, fitting newborns to approximately 3 months (up to about 10 pounds); hat approximately 13 inch head circumference
- Gauge: 18 single crochet stitches and 20 rows = 4 inches worked flat in single crochet with Color A and a G-6 hook, after blocking
- Construction: flat body panel seamed into a tube, 5 triangular star points attached, button bands, neck band, and a pointed pixie hat worked in joined rounds
- Skill level: Intermediate
Body Panel Pattern
With Color A and a G-6 hook, chain 63.
Foundation Row (WS): Sc into 2nd ch from hook and into each ch across. Turn. (62 sc)
Row 1 (RS): Ch 1, turn, sc in each st across. (62 sc)
Row 2 (WS): Ch 1, turn, sc in each st across. (62 sc)
Switch to Color B at the end of Row 2 by drawing Color B through the last 2 loops of the last st.
Row 3 (RS): Ch 1, turn, sc in each st across. (62 sc)
Row 4 (WS): Ch 1, turn, sc in each st across. (62 sc)
Switch to Color A. Continue in this 2-row stripe sequence (2 rows Color A, 2 rows Color B) until the panel measures approximately 9 inches from the foundation row. This will be approximately 46 rows total. The piece should measure 9 inches tall and approximately 13.8 inches wide.
Shaping Row 1 (RS): Ch 1, turn, sc in first 27 sts, sc2tog, sc2tog, sc in rem 29 sts. (60 sc)
Shaping Row 2 (WS): Ch 1, turn, sc in first 26 sts, sc2tog, sc2tog, sc in rem 28 sts. (58 sc)
Shaping Row 3 (RS): Ch 1, turn, sc in first 25 sts, sc2tog, sc2tog, sc in rem 27 sts. (56 sc)
Shaping Row 4 (WS): Ch 1, turn, sc in first 24 sts, sc2tog, sc2tog, sc in rem 26 sts. (54 sc)
Shaping Row 5 (RS): Ch 1, turn, sc in first 23 sts, sc2tog, sc2tog, sc in rem 25 sts. (52 sc)
Shaping Row 6 (WS): Ch 1, turn, sc in first 22 sts, sc2tog, sc2tog, sc in rem 24 sts. (50 sc)
Fasten off, leaving a 24-inch tail for seaming. Fold the panel in half lengthwise, right sides together, matching the two short ends, and whipstitch the back seam closed along the full length, then whipstitch the base curved shaping closed. Turn right side out. The seamed body tube should measure approximately 9 inches tall and approximately 6.5 inches in diameter at the widest point.
Star Points Pattern
Make 5 points, all using the same stripe sequence. With Color A, chain 3, sl st to join into a ring (or use a magic ring).
Round 1: Ch 1, work 3 sc into ring, do not join, work in continuous rounds and place a marker at the centre st. (3 sc)
Row 2: Ch 1, turn, inc in first st, sc in centre st, inc in last st. (5 sc)
Row 3: Ch 1, turn, sc across. (5 sc)
Switch to Color B.
Row 4: Ch 1, turn, inc in first st, sc in next 3 sts, inc in last st. (7 sc)
Row 5: Ch 1, turn, sc across. (7 sc)
Switch to Color A.
Row 6: Ch 1, turn, inc in first st, sc in next 5 sts, inc in last st. (9 sc)
Row 7: Ch 1, turn, sc across. (9 sc)
Switch to Color B.
Row 8: Ch 1, turn, inc in first st, sc in next 7 sts, inc in last st. (11 sc)
Row 9: Ch 1, turn, sc across. (11 sc)
Switch to Color A.
Row 10: Ch 1, turn, inc in first st, sc in next 9 sts, inc in last st. (13 sc)
Row 11: Ch 1, turn, sc across. (13 sc)
Switch to Color B.
Row 12: Ch 1, turn, inc in first st, sc in next 11 sts, inc in last st. (15 sc)
Row 13: Ch 1, turn, sc across. (15 sc)
Switch to Color A.
Row 14: Ch 1, turn, inc in first st, sc in next 13 sts, inc in last st. (17 sc)
Row 15: Ch 1, turn, sc across. (17 sc)
Switch to Color B.
Row 16: Ch 1, turn, inc in first st, sc in next 15 sts, inc in last st. (19 sc)
Row 17: Ch 1, turn, sc across. (19 sc)
Switch to Color A.
Row 18: Ch 1, turn, inc in first st, sc in next 17 sts, inc in last st. (21 sc)
Row 19: Ch 1, turn, sc across. (21 sc)
Fasten off, leaving a 20-inch seaming tail. Each finished point measures approximately 4.5 inches tall from tip to base and approximately 4.6 inches wide at the base. Make all 5 points.
Button Band Pattern
Right Front Band (buttonhole band): With RS facing and Color A, join yarn at the bottom right front edge.
Pickup Row: Sc evenly along the right front opening edge, picking up approximately 1 sc for every row end, for a total of approximately 46 sc along the edge. (46 sc)
Band Row 1: Ch 1, turn, sc in each st across. (46 sc)
Band Row 2 (Buttonhole Row): Ch 1, turn, sc in first 10 sts, ch 2, sk 2 sts (first buttonhole made), sc in next 22 sts, ch 2, sk 2 sts (second buttonhole made), sc in rem 10 sts. (46 sts including ch-2 sps)
Band Row 3: Ch 1, turn, sc in each st and 2 sc into each ch-2 sp across. (46 sc)
Band Row 4: Ch 1, turn, sc in each st across. (46 sc)
Fasten off. Weave in ends.
Left Front Band (button band): With RS facing and Color A, join yarn at the top left front edge.
Pickup Row: Sc evenly along the left front opening edge, picking up approximately 46 sc. (46 sc)
Band Rows 1 through 4: Ch 1, turn, sc in each st across. (46 sc each row)
Fasten off. Weave in ends. Sew the two coconut shell buttons onto the left front band to align with the buttonholes, the first approximately 10 stitches up from the bottom of the band and the second approximately 32 stitches up.
Neck Band Pattern
With RS facing and Color A, join yarn at the back right of the neck opening.
Round 1: Sc evenly around the neck opening, picking up approximately 1 sc per row end or stitch all the way around. Work approximately 36 sc around the opening, adjusting so the count is even. Join with sl st to first sc. (36 sc)
Round 2: Ch 1, sc in each st around. Join with sl st to first sc. (36 sc)
Fasten off. Weave in ends.
Pixie Hat Pattern
The hat is worked in joined rounds in the same 2-round stripe rhythm. With Color A, make a magic ring.
Round 1: Ch 1, work 6 sc into ring, sl st to join to first sc. (6 sc)
Round 2: Ch 1, inc in each st around, sl st to join. (12 sc)
Round 3: Ch 1, (sc in next st, inc in next st) rep 6 times, sl st to join. (18 sc)
Round 4: Ch 1, (sc in next 2 sts, inc in next st) rep 6 times, sl st to join. (24 sc)
Round 5: Ch 1, (sc in next 3 sts, inc in next st) rep 6 times, sl st to join. (30 sc)
Switch to Color B.
Round 6: Ch 1, (sc in next 4 sts, inc in next st) rep 6 times, sl st to join. (36 sc)
Round 7: Ch 1, sc in each st around, sl st to join. (36 sc)
Switch to Color A.
Round 8: Ch 1, (sc in next 5 sts, inc in next st) rep 6 times, sl st to join. (42 sc)
Round 9: Ch 1, sc in each st around, sl st to join. (42 sc)
Switch to Color B.
Round 10: Ch 1, (sc in next 6 sts, inc in next st) rep 6 times, sl st to join. (48 sc)
Round 11: Ch 1, sc in each st around, sl st to join. (48 sc)
Switch to Color A.
Round 12: Ch 1, (sc in next 7 sts, inc in next st) rep 6 times, sl st to join. (54 sc)
Round 13: Ch 1, sc in each st around, sl st to join. (54 sc)
Switch to Color B.
Round 14: Ch 1, (sc in next 8 sts, inc in next st) rep 6 times, sl st to join. (60 sc)
Round 15: Ch 1, sc in each st around, sl st to join. (60 sc)
Switch to Color A.
Rounds 16 and 17: Ch 1, sc in each st around, sl st to join. (60 sc each round)
Switch to Color B.
Rounds 18 and 19: Ch 1, sc in each st around, sl st to join. (60 sc each round)
Switch to Color A for the brim border.
Round 20: Ch 1, sc in each st around, sl st to join. (60 sc)
Round 21: Ch 1, sc in each st around, sl st to join. (60 sc)
Fasten off. Weave in all ends.
Finishing & Assembly
Lay the seamed body tube flat with the back seam centred at the back, and find the five attachment positions: top centre back (the hood extension point), upper left and upper right (the two arm points), and lower left and lower right (the two leg points).
Pin each star point to the outside of the body tube at its 21-stitch base edge, then whipstitch each point base firmly to the body, distributing the 21 stitches along approximately 4 to 5 inches of body surface.
Weave in all ends before blocking. Wet block by submerging the cocoon and hat in cool water for 15 minutes, pressing out excess water without wringing, and pinning the star points out to their full triangular dimensions on a blocking mat. Allow to dry completely (12 to 24 hours) before unpinning.
Tips
Gauge is critical here — a loose swatch makes an oversized cocoon that will not hold a newborn snugly, and a tight one will be too small, so do swatch first.
Carry the unused stripe colour loosely up the side instead of cutting it; your wrong side stays tidy and you have far fewer ends.
For care, machine wash on a gentle cycle in cold water inside a mesh laundry bag to protect the buttons and points, then lay flat to dry and store folded.
Always supervise baby in a cocoon and use it only as directed for awake time and photos — it is a photo prop and snuggle wrap, not a sleep product.
Mint Green Starfish Baby Cocoon Free Crochet Pattern
Materials
Steps
- Work the striped body panel flat to about 46 rows
- Shape the base with 6 decrease rows and seam into a tube
- Make 5 striped star points to 21 stitches at the base
- Whipstitch the points around the body tube
- Work buttonhole and button bands and the neck band
- Work the striped pixie hat in joined rounds to Round 21
- Block flat, pinning the star points to shape
- Swatch first - gauge decides whether the cocoon fits snugly
- Carry stripe yarn up the side instead of cutting it
- Pin all 5 points in place before sewing any of them
- Wash inside a mesh bag to protect buttons and points


