Ocean Blue Hooded Toddler Sweater Free Crochet Pattern
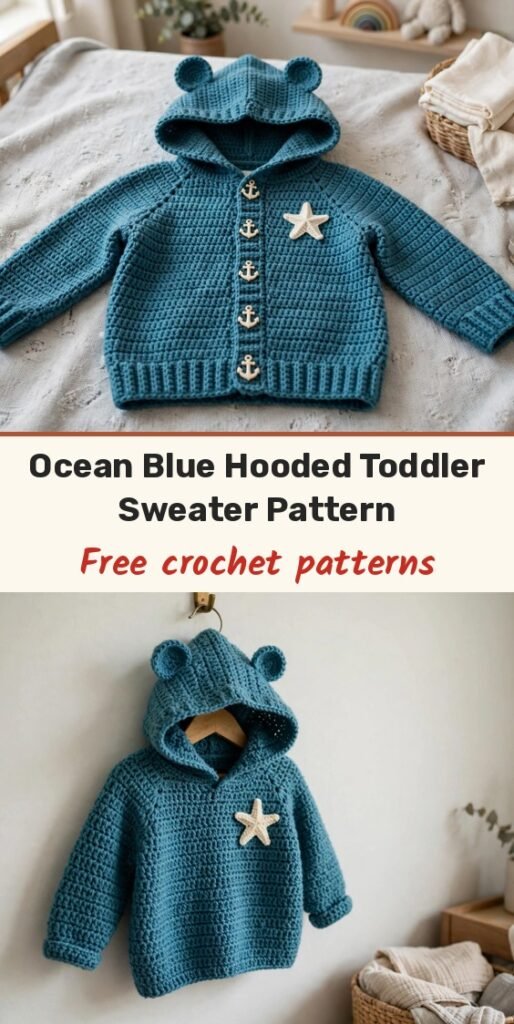
Table of Contents
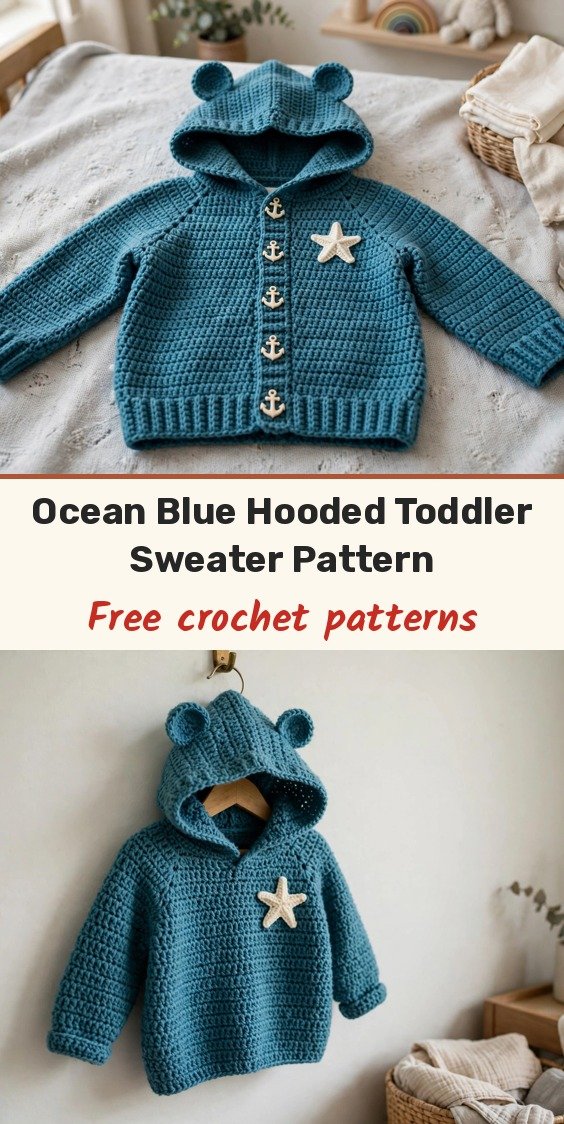
Here is a secret I love sharing: this adorable hooded toddler sweater is built on single crochet — that is it! If you can work a single crochet stitch, you can make this cardigan. The raglan shaping is just adding two stitches at the same marked spots every other row, the hood is a rectangle you fold and sew, and the little bear ears are tiny circles you pinch into shape.
We work from the top down, so you can try the sweater on as you go and adjust the length. The sleeves are picked up right from the body and worked in the round, the hood attaches directly to the neckline, and we finish with ribbed cuffs and hem, cute anchor buttons, and a cream starfish applique on the chest.
The pattern is written for size 12 to 18 months, with the 18 to 24 month size in parentheses. Plan for about 12 to 18 hours of happy stitching for the smaller size.
Materials
- Approximately 600 yards (700 yards for the larger size) of worsted weight (Category 4) yarn in ocean teal-blue (main colour)
- Approximately 30 yards of worsted weight yarn in cream or off-white, for the starfish applique (contrast colour)
- 6.0mm (US J) crochet hook, for the main fabric
- 5.5mm (US I) crochet hook, for the ribbing on the cuffs and hem
- At least 6 stitch markers
- Yarn needle for finishing
- 5 anchor-shaped wooden or resin buttons, approximately 0.75 inch / 19mm
- Sewing thread and needle for the buttons
- Scissors
- Rust-proof pins for blocking
- Optional: small piece of faux leather, about 1.5 x 0.75 inches, for a label
Abbreviations
- sc: single crochet
- ch: chain
- sl st: slip stitch
- inc: increase, work 2 sc in the same stitch
- sc2tog: single crochet two together (decrease)
- blo: back loop only
- RS/WS: right side / wrong side
- pm: place marker
- sm: slip marker
- MC: main colour (ocean blue)
- CC: contrast colour (cream)
Gauge & Size
- Finished size: 12 to 18 months (18 to 24 months) — chest circumference 22 inches / 56 cm (24 inches / 61 cm), total length 13 inches / 33 cm (14 inches / 35.5 cm), sleeve length 7 inches / 18 cm (8 inches / 20 cm) from underarm to cuff, hood 8 inches / 20 cm (8.5 inches / 21.5 cm) tall
- Gauge: 14 sc = 4 inches / 10 cm and 16 rows = 4 inches / 10 cm in single crochet worked flat with the 6.0mm hook
- Construction: top-down raglan yoke, body worked flat, sleeves picked up and worked in the round, hood picked up from the neckline
- Skill level: Intermediate
Two notes before we begin: the ch 1 at the start of each row does NOT count as a stitch, so skip it and work your first sc into the first actual stitch. And raglan increases happen on right side rows only — we alternate an increase row with a plain row. Four raglan markers divide the yoke into five sections: left front, left sleeve, back, right sleeve and right front.
The Yoke
Foundation chain: With MC and the 6.0mm hook, ch 33 (37).
Row 1 (WS): Sc in the 2nd ch from hook and in each ch across, ch 1, turn. (32 sc) (36 sc)
Now place your raglan markers. For 32 stitches: 4 left front, marker, 4 left sleeve, marker, 16 back, marker, 4 right sleeve, marker, 4 right front. For 36 stitches: 5 left front, marker, 4 left sleeve, marker, 18 back, marker, 4 left sleeve, marker, 5 right front.
Row 2 (RS, raglan increase row): Ch 1, turn, sc in each st to 1 st before the marker, inc, slip marker, inc — repeat this at all 4 raglan points — sc to the end, ch 1, turn. (40 sc) (44 sc)
Row 3 (WS, plain row): Ch 1, turn, sc in each st across, slipping markers as you pass them, ch 1, turn. (40 sc) (44 sc)
Row 4 (RS): Raglan increase row. (48 sc) (52 sc)
Row 5 (WS): Plain row. (48 sc) (52 sc)
Row 6 (RS): Raglan increase row. (56 sc) (60 sc)
Row 7 (WS): Plain row. (56 sc) (60 sc)
Row 8 (RS): Raglan increase row. (64 sc) (68 sc)
Row 9 (WS): Plain row. (64 sc) (68 sc)
Row 10 (RS): Raglan increase row. (72 sc) (76 sc)
Row 11 (WS): Plain row. (72 sc) (76 sc)
Row 12 (RS): Raglan increase row. (80 sc) (84 sc)
Row 13 (WS): Plain row. (80 sc) (84 sc)
Row 14 (RS): Raglan increase row. (88 sc) (92 sc)
Row 15 (WS): Plain row. (88 sc) (92 sc)
Row 16 (RS): Raglan increase row. (96 sc) (100 sc)
Row 17 (WS): Plain row. (96 sc) (100 sc)
Size 12 to 18 months stops here. Size 18 to 24 months continues:
Row 18 (RS): Raglan increase row. (108 sc)
Row 19 (WS): Plain row. (108 sc)
Yoke checkpoint: measured flat from the centre back neck to the base of the yoke, your piece should be approximately 4.5 inches / 11.5 cm (5 inches / 12.7 cm).
The Body
Separation Row (RS): Ch 1, turn, sc across the 12 (14) left front sts, ch 4 to bridge the underarm gap, skip the 20 (22) left sleeve sts (put them on a stitch holder or scrap yarn), sc across the 32 (36) back sts, ch 4, skip the 20 (22) right sleeve sts, sc across the 12 (14) right front sts, ch 1, turn. (64 sc) (72 sc, counting the chains as stitches)
Row 1 of Body (WS): Sc in each st and each ch across, ch 1, turn. (64 sc) (72 sc)
Rows 2 to 32 (34): Work even in sc, ch 1 and turn at the end of each row. (64 sc) (72 sc)
Hem Ribbing
Switch to the smaller 5.5mm hook.
Rows 1 to 6: Ch 1, turn, work blo sc in each st across. (64 sc) (72 sc)
Fasten off and weave in the ends.
Sleeves (Make 2)
Return the held sleeve stitches to your hook and attach MC at the centre of the underarm chain bridge.
Setup Round: With the 6.0mm hook and the right side facing, join MC with a sl st at the centre of the underarm chain, sc 2 sts across the remaining half of the underarm chain, sc across all 20 (22) held sleeve sts, sc 2 sts across the remaining half of the underarm chain, join with a sl st to the first sc, place a marker. (24 sc) (26 sc)
Sleeves are now worked in the round — do not turn.
Rounds 1 to 4: Sc in each st around. (24 sc) (26 sc)
Decrease Round 1: Sc2tog, sc to the last 2 sts, sc2tog. (22 sc) (24 sc)
Rounds 5 to 8: Sc in each st around. (22 sc) (24 sc)
Decrease Round 2: Sc2tog, sc to the last 2 sts, sc2tog. (20 sc) (22 sc)
Rounds 9 to 14 (9 to 16): Sc in each st around. (20 sc) (22 sc)
Decrease Round 3: Sc2tog, sc to the last 2 sts, sc2tog. (18 sc) (20 sc)
Rounds 15 to 20 (17 to 24): Work even in sc. (18 sc) (20 sc)
Sleeve Cuff Ribbing
Switch to the smaller 5.5mm hook.
Rounds 1 to 8: Work blo sc in each st around. (18 sc) (20 sc)
Sl st to close and fasten off. Repeat everything for the second sleeve.
Button Bands
Right Front Buttonhole Band pickup: With the right side facing and the 6.0mm hook, join MC at the lower right front corner and work sc evenly up the right front edge, placing approximately 2 sc per every 3 rows. (Approximately 36 sc) (38 sc)
Band Row 1 (RS): Sc in each st across, ch 1, turn. (36 sc) (38 sc)
Band Row 2 (WS, buttonhole row): Sc in the first 2 (3) sts, (ch 2, sk 2 sts, sc in the next 6 sts) 4 times, ch 2, sk 2 sts, sc in the last 2 (3) sts, ch 1, turn.
Band Row 3 (RS): Sc across, working 2 sc into each ch-2 space, ch 1, turn. (36 sc) (38 sc)
Band Row 4 (WS): Sc in each st across, fasten off. (36 sc) (38 sc)
Left Front Button Band: With the right side facing, join MC at the upper left front corner and work 4 rows of sc evenly down the left front edge, with no buttonholes. Fasten off.
The Hood
Neckline Pickup: With the right side facing and the 6.0mm hook, join MC at the upper right front corner and work sc evenly across the entire neckline edge. (32 sc) (36 sc)
Foundation Row (RS): Sc across all sts, ch 1, turn. (32 sc) (36 sc)
Rows 1 to 4: Work even in sc, ch 1, turn. (32 sc) (36 sc)
Row 5 (RS): Sc 14 (16), inc, sc 2, inc, sc 14 (16), ch 1, turn. (34 sc) (38 sc)
Row 6 (WS): Work even, ch 1, turn.
Row 7 (RS): Sc 15 (17), inc, sc 2, inc, sc 15 (17), ch 1, turn. (36 sc) (40 sc)
Row 8 (WS): Work even, ch 1, turn.
Row 9 (RS): Sc 16 (18), inc, sc 2, inc, sc 16 (18), ch 1, turn. (38 sc) (42 sc)
Row 10 (WS): Work even, ch 1, turn.
Row 11 (RS): Sc 17 (19), inc, sc 2, inc, sc 17 (19), ch 1, turn. (40 sc) (44 sc)
Row 12 (WS): Work even, ch 1, turn.
Row 13 (RS): Sc 18 (20), inc, sc 2, inc, sc 18 (20), ch 1, turn. (42 sc) (46 sc)
Row 14 (WS): Work even, ch 1, turn.
Row 15 (RS): Sc 19 (21), inc, sc 2, inc, sc 19 (21), ch 1, turn. (44 sc) (48 sc)
Row 16 (WS): Work even, ch 1, turn.
Work even in sc for 12 more rows (14 more rows for the larger size). (44 sc) (48 sc)
Hood Top Seam: Fold the hood in half so the short side edges meet, and seam the top edge closed with a whipstitch or a slip stitch through both layers.
Bear Ears (Make 2)
Round 1: With MC and the 6.0mm hook, make a magic ring and work 6 sc into it, pull closed, and work in a continuous spiral. (6 sc)
Round 2: Inc in each st around. (12 sc)
Round 3: (Sc 1, inc) 6 times. (18 sc)
Round 4: (Sc 2, inc) 6 times. (24 sc)
Sl st to close, fasten off leaving a long tail. Pinch the bottom quarter of the circle together to form a cup shape and stitch the pinched base closed. Sew both ears to the top corners of the hood, approximately 2 inches apart.
Starfish Applique
Round 1: With CC and the 6.0mm hook, make a magic ring, ch 1, work 10 sc into the ring, pull closed, join with a sl st. (10 sc)
Now make 5 arms, each using 2 adjacent stitches of the centre ring as its base.
Arm Row 1: Join the yarn in the first base st, ch 1, sc in the same st, sc in the next st, ch 1, turn. (2 sc)
Arm Row 2: Inc in the first st, inc in the second st, ch 1, turn. (4 sc)
Arm Row 3: Sc in each st, ch 1, turn. (4 sc)
Arm Row 4: Sc2tog, sc2tog, ch 1, turn. (2 sc)
Arm Row 5: Sc2tog, fasten off. (1 sc)
Repeat for the remaining 4 arms, then sew the starfish to the upper left chest, about 2.5 inches below the neckline.
Finishing & Assembly
Weave in all remaining ends. Sew the 5 anchor buttons onto the left front band, opposite the buttonholes, and attach the optional faux leather label to the lower right corner of the hem.
Block the sweater by soaking it in cool water for 20 minutes, rolling it in a towel to remove the water, then pinning it to the finished measurements and letting it dry completely.
For acrylic yarn, machine wash on a gentle cold cycle and lay flat to dry with no high heat. For wool, hand wash in cool water with wool wash, press the water out gently, and lay flat to dry — never wring it.
Tips
Choose a smooth, non-splitty yarn — fuzzy fibres hide your stitches and make the seaming harder, and you want to see every sc in a single-crochet garment.
Count at the end of every raglan row. The counts grow by exactly 8 on increase rows, so a quick count catches mistakes while they are still easy to fix.
Because the sweater is worked top-down, try it on your little one as you go and adjust the body and sleeve length before the ribbing.
Slip the raglan markers as you pass them rather than removing them — those four points are your map for the whole yoke.
Ocean Blue Hooded Toddler Sweater Free Crochet Pattern
Materials
Steps
- Chain 33 (37) and set up the raglan yoke with 4 markers
- Work alternate increase and plain rows to 96 (108) sts
- Separate the sleeves and work the body to row 32 (34)
- Add the BLO hem ribbing
- Pick up each sleeve and work it in the round with 3 decrease rounds, then add cuff ribbing
- Work the buttonhole band and plain button band
- Pick up and shape the hood, seam the top, and add the bear ears
- Make and sew on the starfish applique, add buttons, and block
- The turning chain does not count as a stitch in this pattern
- Count after every increase row — the yoke grows by exactly 8 sts
- Try the top-down body on as you go and adjust lengths before the ribbing
- Use smooth, non-splitty yarn so the single crochet fabric stays neat


