Navy Blue Nautical Baby Romper Free Crochet Pattern
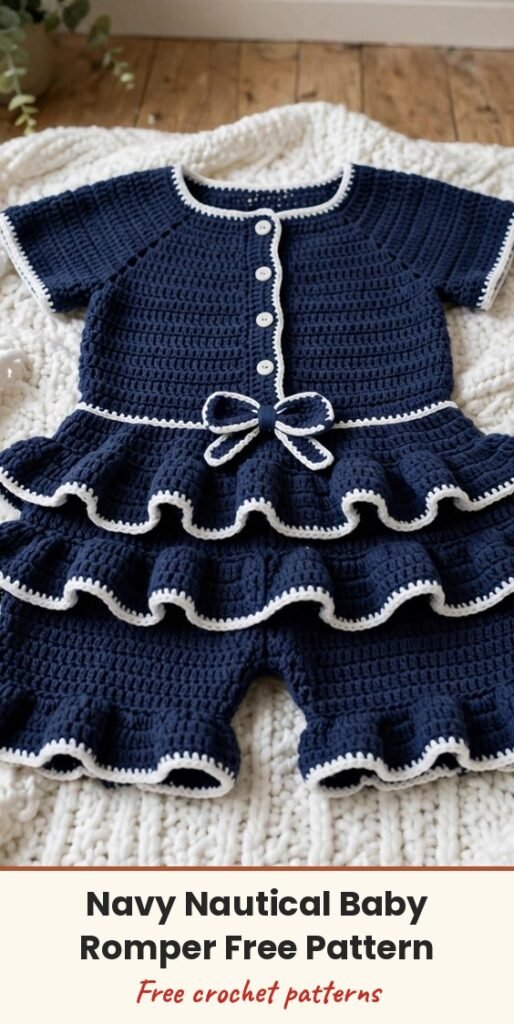
Table of Contents
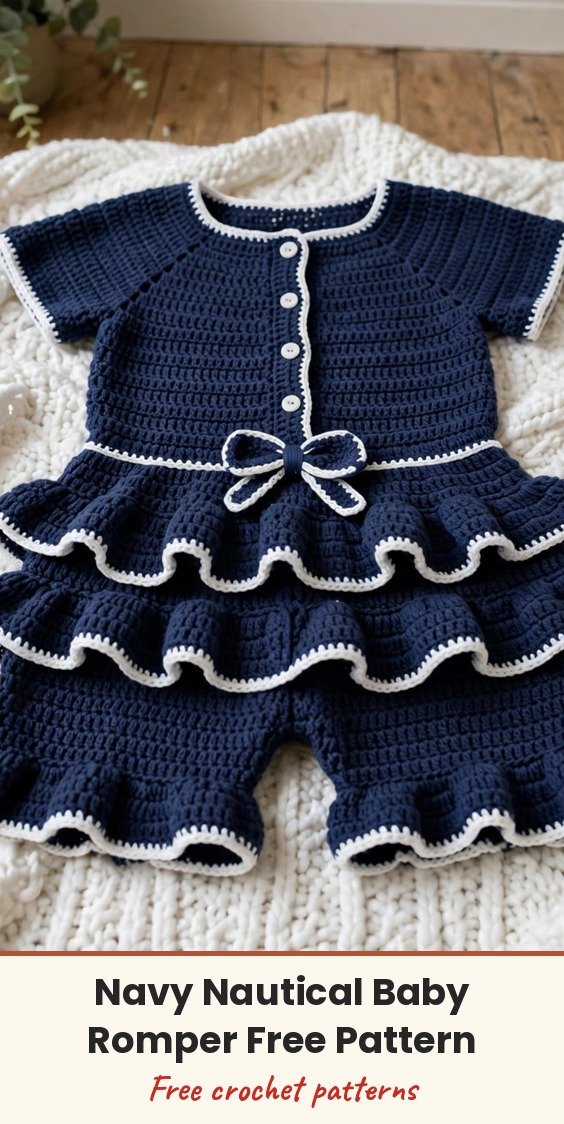
I set out to make a baby romper that turns heads, and this navy nautical romper with its crisp white trim is the one I keep coming back to! Three ruffled tiers edged in white, a sweet bow at the waist and little anchor details give it that classic sailor charm.
We will work the bodice first in flat panels with a pretty back-loop ribbed texture, then add the three ruffle tiers, and finish with the bottom section, bow and edging. The pattern is written for size 6 to 12 months, with a chest of about 18 inches and a length of about 14 inches from shoulder to bottom edge.
It is an intermediate pattern, but the construction is straightforward once you see how the sections fit together. Let us make something adorable!
Materials
- Approximately 200 yards of navy blue worsted weight yarn (soft acrylic or cotton blend)
- Approximately 50 yards of white worsted weight yarn for trim and bow details
- 4.0mm (G/6) crochet hook
- 3.5mm (E/4) crochet hook for trim work
- Yarn needle for weaving in ends
- At least 4 stitch markers
- Scissors
- 2 small buttons for the shoulder straps (optional)
- 3 small anchor buttons or appliqués for decoration
Abbreviations
- ch: chain
- sl st: slip stitch
- sc: single crochet
- hdc: half double crochet
- dc: double crochet
- inc: increase, 2 stitches into the same stitch
- dec: decrease (sc2tog)
- BLO: back loop only
Gauge & Size
- Finished size: 6 to 12 months; chest approximately 18 inches; length from shoulder to bottom edge approximately 14 inches
- Gauge: 14 stitches and 16 rows = 4 inches in single crochet with the 4.0mm hook
- Construction: bodice worked flat in front and back panels, three ruffle tiers worked in rounds onto the bodice, bottom section worked separately and attached
- Skill level: Intermediate
Bodice Front Panel
With navy yarn and the 4.0mm hook:
Row 1: Ch 33, sc in 2nd ch from hook and in each ch across, turn. (32 sts)
Row 2: Ch 1, sc in BLO of each st across, turn. (32 sts)
Rows 3 to 6: Repeat Row 2. (32 sts)
Row 7: Ch 1, sc in both loops of each st across, turn. (32 sts)
Rows 8 to 14: Ch 1, sc in each st across, turn. (32 sts)
Row 15: Ch 1, skip first 3 sts, sc in next 26 sts, leave remaining 3 sts unworked, turn. (26 sts)
Row 16: Ch 1, dec over first 2 sts, sc in each st to last 2 sts, dec over last 2 sts, turn. (24 sts)
Rows 17 to 20: Ch 1, sc in each st across, turn. (24 sts)
First strap — Row 21: Ch 1, sc in first 6 sts, turn, leaving the remaining stitches unworked. (6 sts)
Rows 22 to 30: Ch 1, sc in each st across, turn. (6 sts)
Fasten off and weave in ends.
Second strap: skip the center 12 stitches, join navy yarn to the next stitch with a sl st.
Row 21: Ch 1, sc in same st and next 5 sts, turn. (6 sts)
Rows 22 to 30: Ch 1, sc in each st across, turn. (6 sts)
Fasten off.
Bodice Back Panel
Repeat Rows 1 to 20 of the Bodice Front Panel exactly.
First back strap — Row 21: Ch 1, sc in first 6 sts, turn. (6 sts)
Rows 22 to 28: Ch 1, sc in each st across, turn. (6 sts)
Fasten off.
Second back strap: skip the center 12 stitches and join navy yarn to the next stitch.
Row 21: Ch 1, sc in same st and next 5 sts, turn. (6 sts)
Rows 22 to 28: Ch 1, sc in each st across, turn. (6 sts)
Fasten off.
Joining the Bodice
Place the front and back panels with right sides together. Using your yarn needle and navy yarn, whip stitch the side seams from the bottom edge up to the armhole shaping.
For the shoulder straps, you can sew them together permanently, or add small buttons to the back straps and create buttonholes on the front straps — the button option makes dressing baby much easier. To create buttonholes (optional): on the front straps at Row 28, work sc in first 2 sts, ch 2, skip 2 sts, sc in last 2 sts.
Ruffle Skirt
First Ruffle Tier: with right side facing, join navy yarn at the side seam along the bottom edge of the bodice.
Round 1: Ch 1, work 64 sc evenly around the entire bottom edge of the bodice, sl st to first sc to join. (64 sts)
Round 2: Ch 3 (counts as dc), dc in same st, 2 dc in each st around, sl st to top of ch-3 to join. (128 sts)
Round 3: Ch 3, dc in each st around, sl st to top of ch-3 to join. (128 sts)
Round 4: Ch 3, dc in each st around, sl st to join. (128 sts)
White trim: change to white yarn. Ch 1, sc in each st around, sl st to join. Fasten off white.
Second Ruffle Tier: join navy yarn to any stitch on Round 1 of the first ruffle (the round attached to the bodice).
Round 1: Working in the unused loops of Round 1 from the first tier, ch 3, dc in same st, 2 dc in each st around, sl st to join. (128 sts)
Rounds 2 to 3: Ch 3, dc in each st around, sl st to join. (128 sts)
White trim: change to white yarn. Ch 1, sc in each st around, sl st to join. Fasten off.
Third Ruffle Tier: this tier attaches slightly lower, working into Round 1 of the second ruffle (where it joins the first tier).
Round 1: Join navy yarn, ch 3, dc in same st, 2 dc in each st around, sl st to join. (128 sts)
Rounds 2 to 3: Ch 3, dc in each st around, sl st to join. (128 sts)
White trim: change to white yarn. Ch 1, sc in each st around, sl st to join. Fasten off.
Bottom Section
With navy yarn:
Row 1: Ch 41, sc in 2nd ch from hook and in each ch across, turn. (40 sts)
Rows 2 to 4: Ch 1, sc in each st across, turn. (40 sts)
Row 5: Ch 1, dec, sc to last 2 sts, dec, turn. (38 sts)
Rows 6 to 8: Ch 1, sc in each st across, turn. (38 sts)
Row 9: Ch 1, dec, sc to last 2 sts, dec, turn. (36 sts)
Rows 10 to 12: Ch 1, sc in each st across, turn. (36 sts)
Row 13: Ch 1, dec, sc to last 2 sts, dec, turn. (34 sts)
Rows 14 to 20: Ch 1, sc in each st across, turn. (34 sts)
First leg — Row 21: Ch 1, sc in first 10 sts, turn, leaving the remaining stitches unworked. (10 sts)
Rows 22 to 26: Ch 1, sc in each st across, turn. (10 sts)
Fasten off. Skip the center 14 stitches and join yarn to the next stitch.
Second leg — Row 21: Ch 1, sc in same st and next 9 sts, turn. (10 sts)
Rows 22 to 26: Ch 1, sc in each st across, turn. (10 sts)
Fasten off. Make a second identical bottom panel for the back.
Decorative Bow
With navy yarn, ch 31.
Row 1: Sc in 2nd ch from hook and in each ch across, turn. (30 sts)
Rows 2 to 8: Ch 1, sc in each st across, turn. (30 sts)
Fasten off, leaving a long tail. Join white yarn at any corner and work sc evenly around all four edges of the rectangle, placing 3 sc in each corner. Sl st to join and fasten off.
Bow center: with navy yarn, ch 11, sc in 2nd ch from hook and in each ch across. (10 sts) Work 6 more rows of 10 sc each and fasten off.
Pinch the large rectangle in the center to create the bow shape, wrap the smaller piece around the center tightly and sew in place on the back. Attach the completed bow to the waist area of the romper at the center front.
Finishing & Assembly
Place the front and back bottom panels with right sides together, sew the side seams and the inner leg seams using whip stitch, and turn right side out. Pin the top edge of the bottom section to the inside of the bodice, just above where the third ruffle attaches, and whip stitch securely in place, ensuring the ruffles drape naturally over the seam.
Sew three small anchor buttons or appliqués evenly spaced across the front of the bottom section.
Armhole edging: with white yarn and the 3.5mm hook, join white yarn at the underarm of one armhole and sc evenly around the entire armhole opening, working approximately 36 to 40 sc total. Sl st to join and fasten off. Repeat for the second armhole. For the straps, join white yarn at the back corner of one strap and sc evenly around the outer edges of both straps, working up one side, across the top, and down the other side. Fasten off.
Weave in all remaining ends securely — for baby items, I weave ends back and forth at least three times so they cannot work loose during washing. Block the romper gently by dampening it and laying it flat to dry. If you added buttonholes, sew your buttons to the back straps now and test the closure.
Tips
If your ruffles are too stiff, your gauge may be too tight — try going up a hook size for the ruffle sections only. If they are too floppy, go down a hook size or add an extra row to each ruffle tier.
If the leg openings feel too tight, add a few extra rows to the bottom section leg shaping, or use a larger hook for the leg edging.
Swap navy for red or pink for a completely different look, or skip the anchors and add small flower appliqués instead.
Machine wash on a gentle cycle with cold water if made with acrylic yarn, and lay flat to dry to maintain the shape of the ruffles.
Navy Blue Nautical Baby Romper Free Crochet Pattern
Materials
Steps
- Work the bodice front panel with back-loop ribbing, armhole shaping and two straps
- Work the bodice back panel and join the side seams
- Work three ruffle tiers in rounds onto the bodice, each edged in white
- Work two bottom panels with leg shaping and sew them together
- Crochet the bow and its center wrap and attach at the waist
- Add anchor buttons, white armhole and strap edging, then block gently
- Weave baby-item ends back and forth at least three times so they stay put in the wash
- Use the button-and-buttonhole strap option for easier dressing
- Go up a hook size on the ruffles if they feel too stiff
- Lay flat to dry to keep the ruffles in shape


