Mint Garden Baby Crochet Dress Free Pattern
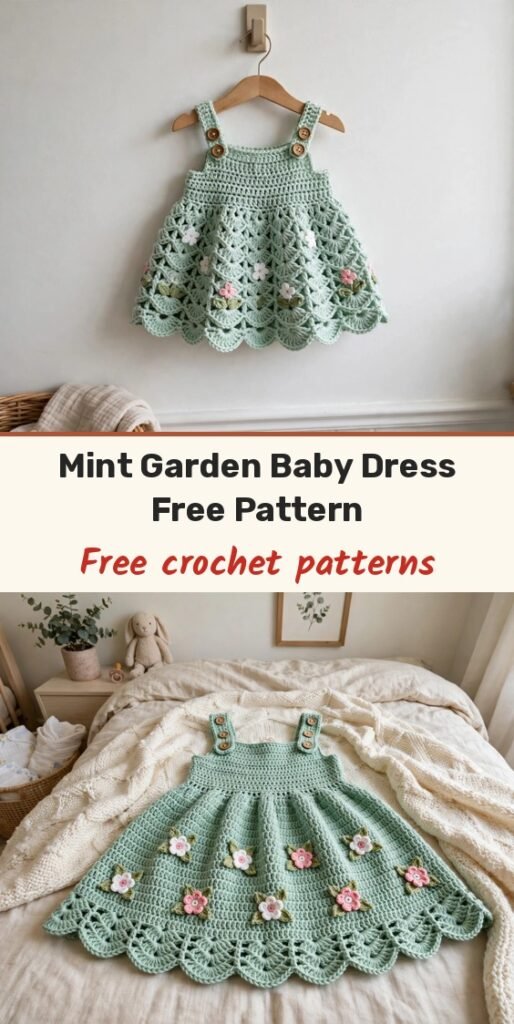
Table of Contents
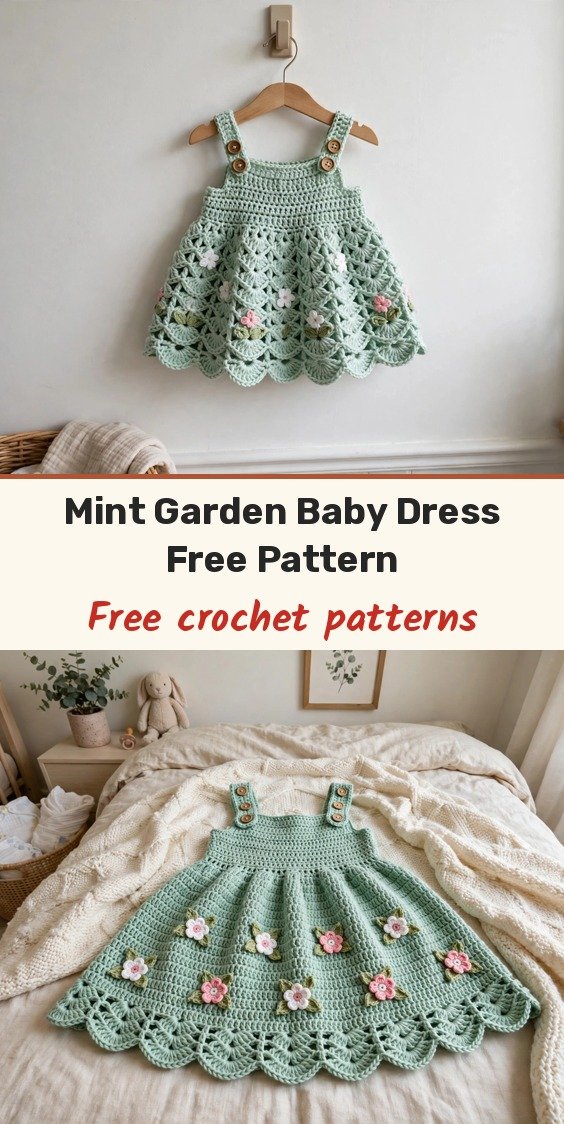
This sweet mint garden dress makes me smile every single time I see it! We will work a soft mint dress covered in pretty shell stitch scallops, then finish it with tiny flower and leaf appliqués that turn a simple silhouette into a little garden party outfit.
The dress is worked from the bottom hem up to the bodice in one piece, so there is minimal seaming to worry about. The scalloped edges along the neckline, armholes, and hem all happen naturally as part of the shell pattern, and the straps fasten with buttons, which makes dressing and changing so much easier for parents.
This size fits 6 to 12 months, and I have included simple notes for adjusting smaller or larger. It is perfect for a baby shower gift, spring photos, or layering over a onesie with tights!
Materials
- 200 to 250 yards of DK weight yarn in mint green, soft cotton blend or machine-washable acrylic
- Small amounts of yarn in white, pink, and olive green, for the flower appliqués
- 4.0 mm crochet hook (US G/6)
- 4 small buttons, approximately 12 mm diameter
- Yarn needle for weaving ends
- Stitch markers
- Scissors
Abbreviations
- ch: chain
- sc: single crochet
- dc: double crochet
- hdc: half double crochet
- sk: skip
- sl st: slip stitch
Special Stitches
Shell Stitch: Work 5 dc into the same stitch. This little fan of stitches creates the scalloped waves that run through the whole dress, and a smaller 3 dc version shapes the waist.
Gauge & Size
- Finished size: 6 to 12 months; chest circumference 18 inches, length from shoulder to hem 14 inches, skirt width at hem 22 inches
- Gauge: 4 shell repeats and 8 rows in shell stitch pattern = approximately 4 inches square
- Construction: skirt worked flat from the hem upward, waist decreases, bodice worked in rows of sc, divided for front and back, button straps, sewn-on appliqués
- Skill level: Intermediate
Skirt
The skirt is worked flat from the hem upward. Chain 109 to begin.
Row 1 (Right Side): Sc in 2nd ch from hook, (sk 2 ch, 5 dc in next ch for a shell, sk 2 ch, sc in next ch) repeat across. (18 shells, 19 sc)
Row 2: Ch 3 (counts as first dc here and throughout), 2 dc in first sc, (sc in centre dc of next shell, 5 dc in next sc) repeat across, ending with sc in centre dc of last shell, 3 dc in last sc. (17 full shells, 2 half shells at edges)
Row 3: Ch 1, sc in first dc, (5 dc in next sc, sc in centre dc of next shell) repeat across, ending with 5 dc in last sc, sc in top of turning ch. (18 shells, 19 sc)
Rows 4 through 24: Repeat Rows 2 and 3 alternately, ending with Row 2. Your skirt should measure approximately 9 inches from the foundation chain.
Waist
Now we bring the skirt in gently for that empire waist shape, using smaller 3 dc shells.
Row 25: Ch 1, sc in first dc, (3 dc in next sc for a small shell, sc in centre dc of next shell) repeat across, ending with 3 dc in last sc, sc in top of turning ch. (18 small shells, 19 sc)
Row 26: Ch 2, dc in first sc, (sc in centre dc of next small shell, 3 dc in next sc) repeat across, ending with sc in centre dc of last small shell, 2 dc in last sc. (17 full small shells, 2 half shells)
Rows 27 and 28: Continue in the small shell pattern as established. Your waist section should now be noticeably narrower than the skirt.
Bodice
Row 29: Ch 1, sc in each dc and sc across, working 1 sc in each stitch. (72 sc)
Row 30: Ch 1, sc in each sc across. (72 sc)
Rows 31 through 34: Repeat Row 30. The bodice should measure approximately 1.5 inches.
Divide for Front & Back
Row 35 (Back Right): Ch 1, sc in first 14 sc, turn, leaving the remaining stitches unworked.
Rows 36 through 40: Ch 1, sc in each sc across. (14 sc)
Fasten off. Next we work the front section.
Row 35 (Front): Skip 8 sc for the armhole, join yarn in the next sc, ch 1, sc in same sc and next 27 sc, turn, leaving the remaining stitches unworked. (28 sc)
Rows 36 through 40: Ch 1, sc in each sc across. (28 sc)
Fasten off. Now the second back section.
Row 35 (Back Left): Skip 8 sc for the armhole, join yarn in the next sc, ch 1, sc in same sc and remaining 13 sc. (14 sc)
Rows 36 through 40: Ch 1, sc in each sc across. (14 sc)
Fasten off.
Straps
Make 2 straps.
Row 1: Ch 7, sc in 2nd ch from hook and each ch across. (6 sc)
Rows 2 through 30: Ch 1, sc in each sc across. (6 sc)
Your straps should measure approximately 7 inches long, so adjust the length as needed for your gauge. After Row 30, do not fasten off yet. Work the scallop edging down one long side of the strap: (sk 1 row end, 5 dc in next row end, sk 1 row end, sl st in next row end) repeat along the entire edge, then fasten off. Repeat the scallop edging on the opposite long edge in the same way.
Neckline & Armhole Edging
Join yarn at any corner of the neckline opening.
Round 1: Ch 1, sc evenly around the entire neckline opening, working approximately 3 sc per 2 rows along the sides, join with sl st to first sc.
Round 2: Ch 1, (sc, sk 1 sc, 5 dc in next sc, sk 1 sc) repeat around, adjusting as needed to keep the edging flat, join with sl st.
Fasten off, and repeat the same two rounds for each armhole opening.
Flowers & Leaves
Make 2 or 3 flowers. Using white or pink yarn, make a magic ring.
Round 1: Ch 1, 5 sc into ring, pull ring closed, join with sl st to first sc. (5 sc)
Round 2 (Petals): (Ch 2, 2 dc in same sc, ch 2, sl st in same sc, sl st in next sc) repeat around. (5 petals)
Fasten off, leaving a tail for sewing. Now make 4 to 6 leaves in olive green yarn.
Leaf: Ch 8, sl st in 2nd ch from hook, sc in next ch, hdc in next ch, dc in next 2 ch, hdc in next ch, 3 sc in last ch for the tip. Working down the opposite side of the chain: hdc in next ch, dc in next 2 ch, hdc in next ch, sc in next ch, sl st in last ch.
Fasten off, leaving a tail for sewing.
Finishing & Assembly
Block all pieces lightly by spraying with water and pinning to shape, and let everything dry completely.
Sew the straps to the back bodice pieces, positioning them about 1 inch from the armhole edge, with the decorative scallop edge facing outward. Sew the buttons to the front bodice corners so they align with the straps, and use the natural spaces in the strap fabric as buttonholes, or work a slip stitch around a 3 stitch gap at each strap end.
Arrange the flowers and leaves on the skirt front as you like. I placed one cluster near the bottom left and another near the bottom right. Sew them securely in place with their yarn tails, then weave in all remaining ends.
To make the dress smaller for newborn to 6 months, reduce your starting chain by one shell repeat (6 chains fewer) and work 2 fewer rows on the skirt. For 12 to 18 months, add one shell repeat and 2 additional skirt rows.
Tips
Count your shells every few rows to make sure you have not added or dropped one. It is so much easier to fix a miscount early!
Shell stitch shows tension differences clearly, so keep your double crochets relaxed and even all the way through.
If you cannot find DK weight yarn, a light worsted with a slightly smaller hook works too, as long as you check your gauge first.
For care, machine wash cold on a gentle cycle, lay flat to dry, do not bleach, and use a cool iron if needed while avoiding the appliqués.
Mint Garden Baby Crochet Dress Free Pattern
Materials
Steps
- Work the skirt in shell stitch from a 109-ch foundation to Row 24
- Shape the waist with small shells in Rows 25 to 28
- Work the bodice in single crochet to 72 sts
- Divide and work the back right, front, and back left sections
- Make two straps with scallop edging on both long sides
- Edge the neckline and armholes in two rounds
- Make flower and leaf appliqués and sew them to the skirt front
- Sew straps to the back and buttons to the front
- Count shells every few rows to catch mistakes early
- Keep double crochet tension relaxed and even in shell stitch
- Check gauge if substituting a light worsted yarn with a smaller hook


